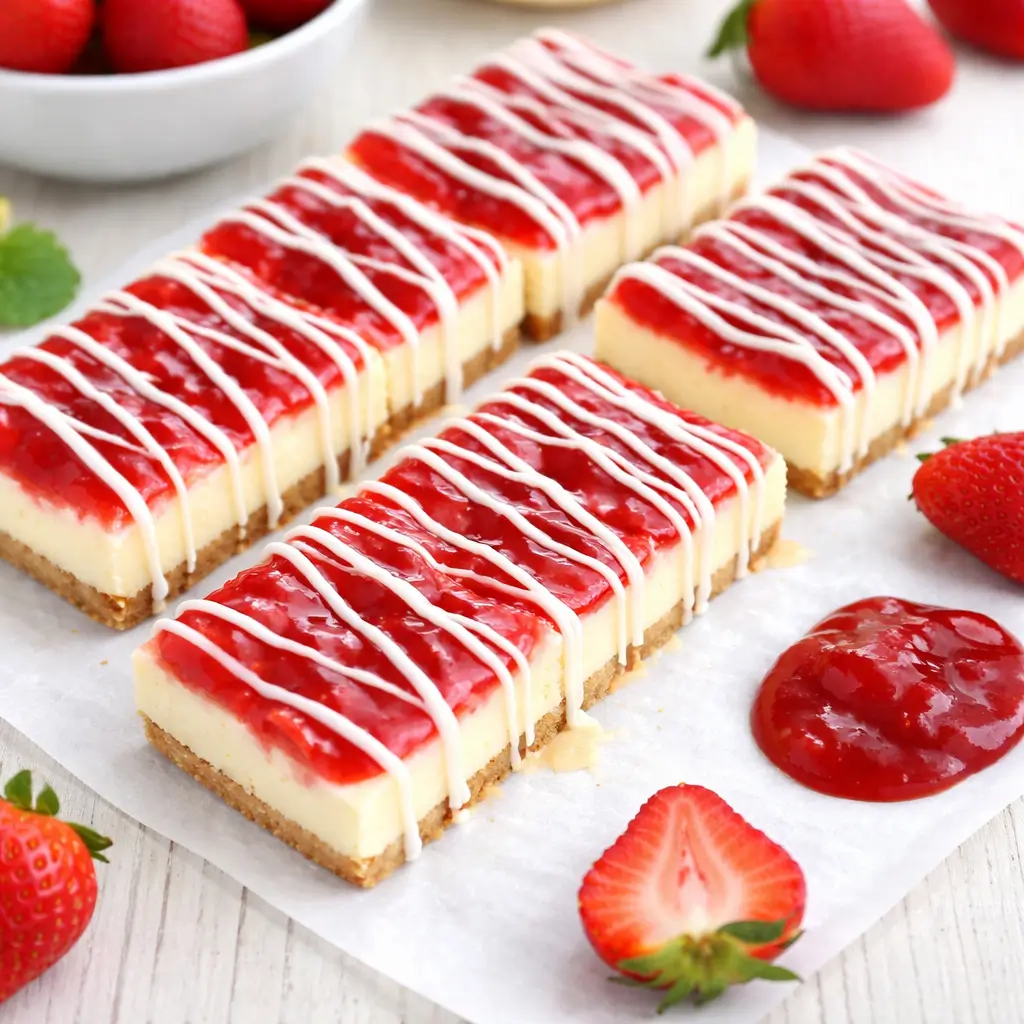
Philadelphia Cheesecake Bars are everything you love about classic cheesecake but in an easy-to-hold, fork-optional form. Think creamy, tangy cheesecake filling nestled on top of a buttery graham cracker crust, crowned with a glossy strawberry topping, and finished with a pretty white chocolate drizzle. These bars are a nod to the beloved Philadelphia Snack Bars many of us grew up with—but honestly, better.
You get all the flavor of a full-sized cheesecake without the stress of springform pans, water baths, or cracking tops. Plus, they’re portable, crowd-pleasing, and impossible to resist. Whether you’re making them for a potluck, family dessert night, or just to stash in the fridge for a “me moment,” these Philadelphia Cheesecake Bars deliver the perfect mix of comfort and nostalgia.
Table of Contents
What is Philadelphia Cheesecake Bars?
Philadelphia Cheesecake Bars are essentially mini cheesecakes baked in a square pan and cut into convenient bars. They feature a crisp graham cracker crust, a luscious cream cheese filling (yes, you’ll want to use real Philadelphia Cream Cheese for that classic flavor), and a vibrant strawberry topping that adds a burst of freshness.
The finishing touch? A white chocolate drizzle that makes them as beautiful as they are delicious. Unlike a traditional cheesecake, these bars require no special pans or complicated baking techniques. Just mix, pour, bake, chill, and slice. The result is a perfectly balanced dessert—sweet, creamy, and a little tangy with that satisfying buttery crunch from the crust.
Reasons to Try Philadelphia Cheesecake Bars
First off, let’s talk about convenience. These Philadelphia Cheesecake Bars give you that “cheesecake experience” without the drama of a water bath or cracked top. They’re portable, pre-portioned, and absolutely stunning on a dessert table. They’re also versatile—you can swap the strawberry topping for blueberry, raspberry, or even lemon curd (check out my Blueberry Lemon Cheesecake Bars if you love a fruity twist).
Another reason? They make people happy. It’s one of those desserts that disappear faster than you can say “save me one.” Plus, the combination of creamy cheesecake, crumbly crust, and juicy strawberries hits that perfect sweet spot without being overly rich. And if you’re craving that nostalgic taste of Philadelphia Snack Bars from your childhood, these are the ultimate throwback treat—homemade, affordable, and even better than the store version.
Ingredients Needed to Make Philadelphia Cheesecake Bars
You don’t need anything fancy—just the basics you probably already have at home:
For the Crust:
- 1 ½ cups graham cracker crumbs (about 11–12 full crackers)
- ¼ cup granulated sugar
- 6 tablespoons melted butter
For the Cheesecake Filling:
- 2 (8-ounce) packages of cream cheese, softened
- ½ cup granulated sugar
- ¼ cup sour cream
- ½ teaspoon vanilla extract
- 2 eggs, room temperature
For the Strawberry Topping:
- 1 ½ cups fresh strawberries, chopped
- 5 tablespoons granulated sugar
- 3 tablespoons water
- 1 tablespoon lemon juice
- 2 teaspoons cornstarch
For the White Chocolate Drizzle:
- ½ cup white chocolate chips
Pro tip: If strawberries aren’t in season, frozen ones work just fine—just cook them a bit longer over low heat.
Instructions to Make Philadelphia Cheesecake Bars – Step by Step
Step 1: Prepare the Pan and Preheat the Oven
Start by preheating your oven to 350°F (177°C). Line an 8×8 or 9×9-inch baking pan with parchment paper, leaving a bit of overhang on the sides for easy removal later. Give it a quick spray with nonstick baking spray—trust me, you’ll thank yourself when it’s time to lift those bars out in one clean swoop.
Step 2: Make the Buttery Graham Cracker Crust
In a medium bowl, combine graham cracker crumbs, sugar, and melted butter. Stir until the crumbs look like wet sand and everything is evenly coated. This step might seem small, but it’s crucial—this crust is the foundation of your bars. Pour the mixture into the prepared pan and press it down firmly using the bottom of a flat measuring cup or the back of a spoon. You want a tight, even layer. Pop the pan into the oven and bake the crust for 8 minutes to set it. Remove it from the oven and let it cool slightly while you prepare the filling.
Step 3: Create the Creamy Cheesecake Filling
Grab your hand mixer (or stand mixer if you’re feeling fancy) and beat together the cream cheese and sugar until smooth and fluffy. Scrape the sides of the bowl often—no one likes surprise lumps of cream cheese later. Add in the sour cream and vanilla extract, mixing until just combined. Then crack in the eggs, one at a time, mixing on low speed until incorporated. Here’s the key: don’t overmix. Overbeating adds air, which can cause cracks during baking. You’re going for silky and smooth, not whipped.
Step 4: Bake to Cheesecake Perfection
Pour that luscious filling over your baked crust and smooth the top with a spatula. Bake for 25–35 minutes, depending on your oven, until the edges are set and the center has just a slight jiggle when you move the pan. It should look almost set but still a little wobbly in the middle—that’s how you know it’ll be creamy, not dry. Let it cool completely at room temperature for about 1–2 hours, then cover the pan and refrigerate for at least 4 hours. This chilling step is non-negotiable; it allows the cheesecake to fully set and develop that classic creamy texture.
Step 5: Make the Strawberry Topping
While the cheesecake is cooling, it’s time to make your topping. In a small saucepan over medium-high heat, combine chopped strawberries, sugar, water, lemon juice, and cornstarch. Stir as it comes to a boil, then reduce the heat and let it simmer gently for about 15 minutes. The strawberries will soften, release their juices, and turn into a glossy red sauce. You’ll know it’s ready when it coats the back of a spoon. Set it aside to cool completely before using. If you prefer a smoother texture, mash the strawberries lightly with a fork.
Step 6: Slice and Assemble Like a Pro
Once your cheesecake has chilled, lift it out of the pan using the parchment sling. Place it on a cutting board and use a long, sharp knife to cut into 8–10 even bars. For clean edges, wipe the blade between cuts (a small but mighty tip). Spoon the cooled strawberry topping onto each bar, spreading it gently to the edges. For the classic “Philadelphia Snack Bar” look, you can make a shallow well down the center of each bar using a melon baller and fill it with the strawberry topping.
Step 7: Drizzle That White Chocolate Magic
In a microwave-safe bowl, melt the white chocolate chips in 20-second bursts, stirring between each until smooth. Transfer the melted chocolate to a small zip-top bag, snip a tiny corner, and drizzle it over each bar in a zigzag pattern. It’s the perfect finishing touch—sweet, creamy, and a little elegant. If you want to take things up a notch, sprinkle a few crushed graham crackers or freeze-dried strawberry crumbs over the drizzle before it sets.
Step 8: Chill and Serve
Pop the assembled bars back in the fridge for about 15–30 minutes to let the topping and chocolate set. Serve them cold straight from the fridge or let them sit at room temperature for 10 minutes for a softer bite. And there you have it—your Philadelphia Cheesecake Bars, ready to make everyone swoon.
Step by Step Summary:
Making Philadelphia Cheesecake Bars Step by Step is all about timing and care—mix, bake, chill, and top. Each layer brings something special to the party, from the crunchy crust to the creamy filling and vibrant strawberry crown. Follow this guide carefully, and you’ll nail that irresistible homemade snack-bar flavor every single time.
If you love fruity desserts like this, try my Strawberry Biscuits with Vanilla Glaze or Peach Pie Crumble Bars next—they’re perfect for using up fresh summer fruit.
What to Serve with Philadelphia Cheesecake Bars
These bars are pretty perfect on their own, but if you’re serving them for a party or special dessert spread, pair them with something light and refreshing. A chilled glass of rosé or sparkling lemonade balances the richness beautifully. You can also serve them alongside fresh berries or a simple fruit salad. For a brunch vibe, try pairing them with my Lemon Rosemary Olive Oil Cake for a citrusy contrast.
Key Tips for Making Philadelphia Cheesecake Bars
- Don’t overbake. A slightly jiggly center is your friend—it means creamy texture ahead.
- Use full-fat cream cheese. This isn’t the time to go light. The rich texture comes from the real deal.
- Chill properly. Four hours minimum. Overnight is even better.
- Cut with a clean knife. Wipe between slices for perfect edges worthy of Instagram.
- Get creative. Swap the topping with raspberries, blueberries, or even chocolate ganache for variety.
Storage and Reheating Tips for Philadelphia Cheesecake Bars
Store your cheesecake bars in an airtight container in the fridge for up to 3 days. If you’ve got leftovers (rare, but it happens), you can also freeze them for up to 2 months. For best results, freeze the bars without the topping, then add it fresh when serving. To thaw, move them to the fridge overnight or let them sit at room temperature for 30 minutes. These bars aren’t meant to be reheated—they’re best enjoyed chilled, creamy, and refreshing straight from the fridge.
FAQs
Can I make these ahead of time? Absolutely. These bars actually taste better the next day once they’ve had time to chill and the flavors meld.
Can I use a different fruit topping? Yes! Blueberry, raspberry, or even cherry pie filling all work beautifully.
Do I have to use Philadelphia brand cream cheese? It’s recommended for that classic flavor, but any high-quality full-fat cream cheese will work.
How can I make them gluten-free? Use gluten-free graham crackers for the crust—everything else is naturally gluten-free.
Final Thoughts
Philadelphia Cheesecake Bars bring together everything we love about homemade desserts—simplicity, flavor, and a touch of nostalgia. They’re creamy, sweet, and beautiful enough to impress but easy enough for a casual bake night. Whether you’re chasing that childhood snack bar memory or just craving a dessert that feels a little special, these bars are a winner every time. They store well, travel easily, and look downright stunning on a plate. Go ahead—make a batch this weekend. Just don’t expect them to last long!
Visit our Pinterest for regular slow cooker recipe updates, or join our Facebook discussions where cooking fans exchange their favorite hearty meal ideas.
Print
Philadelphia Cheesecake Bars – Amazing Homemade Snack Bar Copycat
- Prep Time: 30 minutes
- Cook Time: 25 minutes
- Total Time: 4 hours
- Yield: 8–10 bars 1x
- Category: Dessert
- Method: Baking
- Cuisine: American
- Diet: Vegetarian
Description
These easy Philadelphia Cheesecake Bars are the perfect copycat of the original Philadelphia Snack Bars! Creamy cheesecake filling, buttery graham cracker crust, and the best fresh strawberry topping. Plus they’re simple to make and avoid all the hassle of a full cheesecake.
Ingredients
Crust:
- 1 ½ cups graham cracker crumbs (about 11–12 full crackers)
- ¼ cup granulated sugar
- 6 tablespoon butter, melted
Cheesecake:
- 2 (8 oz) packages cream cheese, softened
- ½ cup granulated sugar
- ¼ cup sour cream
- ½ teaspoon vanilla extract
- 2 eggs, room temperature
Strawberry Topping:
- 1 ½ cups fresh strawberries, chopped
- 5 tablespoon sugar
- 3 tablespoon water
- 1 tablespoon lemon juice
- 2 teaspoon cornstarch
White Chocolate Drizzle:
- ½ cup white chocolate chips
Instructions
1. Preheat the oven to 350°F. Line an 8×8 or 9×9 pan with a parchment sling and spray with baking spray.
2. In a medium bowl, combine graham cracker crumbs, sugar, and melted butter. Press into the bottom of the pan using a measuring cup or tamper.
3. In a large bowl, beat together cream cheese, sugar, sour cream, and vanilla until smooth. Scrape the bowl well.
4. Add eggs and mix on low speed until just combined. Do not overmix.
5. Pour the cheesecake filling over the crust. Bake for 25–35 minutes, until center is mostly set but slightly jiggly. Cool on a wire rack, then refrigerate for 3–4 hours.
6. While baking, make the strawberry sauce: Combine all topping ingredients in a saucepan over medium-high heat. Bring to a boil, then reduce heat and simmer, stirring often, until thick and deep red (about 15 minutes). Cool completely.
7. Once cheesecake is chilled, slice into 8–10 bars with a sharp knife, wiping between cuts.
8. Spoon strawberry topping over each bar, spreading to the edges.
9. Melt white chocolate chips in a microwave-safe bowl in 20-second intervals, stirring between each. Transfer to a zip bag, snip a corner, and drizzle over the bars.
Notes
• Don’t overbake the cheesecake for a smooth, creamy texture.
• Cook the strawberry topping low and slow for a vibrant color and flavor.
• Wipe the knife between cuts for clean slices.
• For the original Philadelphia Snack Bar look, create a well in the center of each bar and fill with strawberry topping before drizzling with white chocolate.
• Store in the fridge in an airtight container for 2–3 days.
• Can be made ahead and stored (topping separate) for up to 2 days.
• Freeze unwrapped bars on a sheet until solid, then wrap and store for up to 2–3 months. Add topping after thawing for best results.
Nutrition
- Serving Size: 1 bar
- Calories: 298
- Sugar: 32g
- Sodium: 188mg
- Fat: 14g
- Saturated Fat: 7g
- Unsaturated Fat: 5g
- Trans Fat: 1g
- Carbohydrates: 42g
- Fiber: 1g
- Protein: 4g
- Cholesterol: 63mg