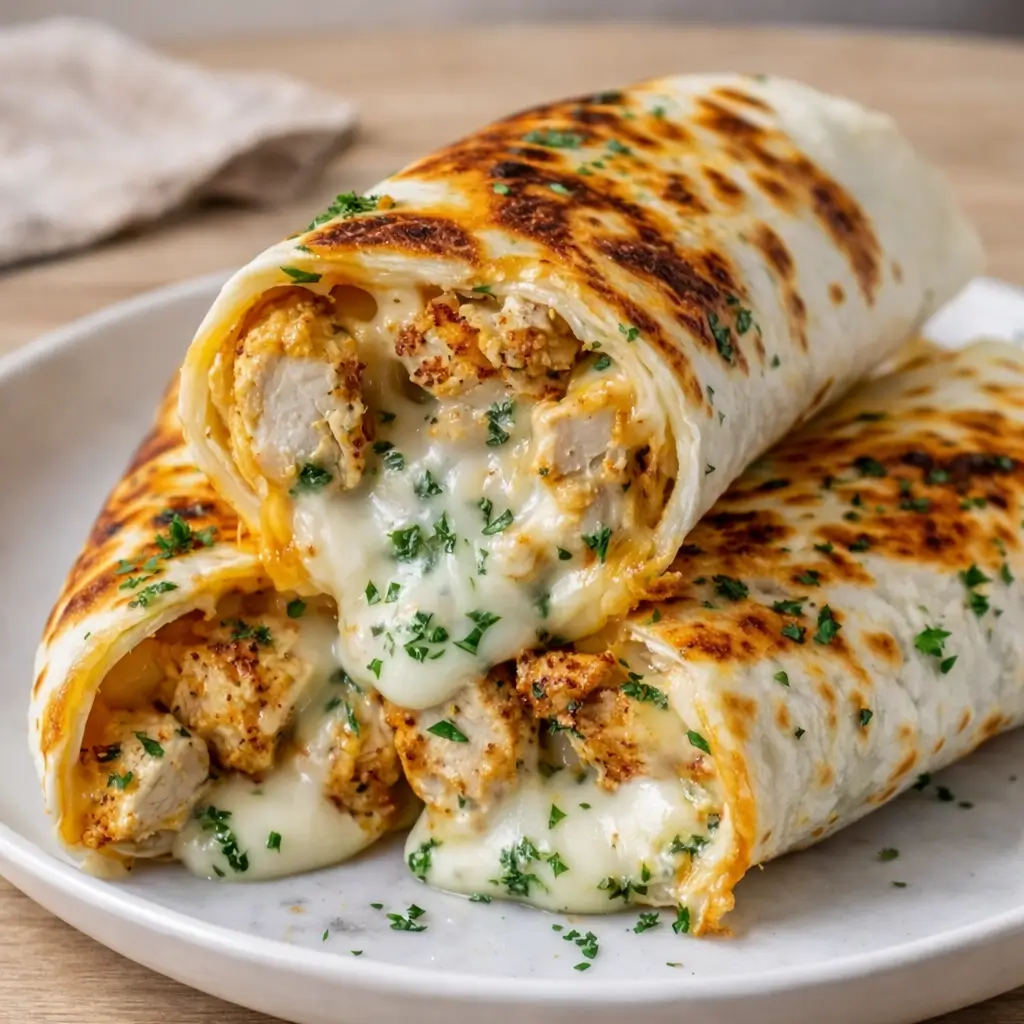
Low Carb Cheesy Garlic Chicken Wraps are exactly what you need when the “what’s for dinner” panic sets in at 5:30 PM. We have all been there, standing in front of the fridge, staring at a rotisserie chicken like it’s going to solve our life problems. Well, today, it actually might. These Low Carb Cheesy Garlic Chicken Wraps take the humble chicken breast and turn it into a gooey, garlicky masterpiece that feels like a total cheat meal without the carb-induced nap afterward. If you are juggling soccer practice, work deadlines, or just trying to find a meal that won’t result in a toddler-led protest, this recipe is a massive win for your kitchen rotation. It is remarkably simple to throw together, yet it tastes like something you’d pay fifteen dollars for at a trendy bistro. Because we are using low-carb tortillas, you can dive into that melty cheese and savory garlic goodness without a hint of guilt. Trust me, once you smell that garlic hitting the warm skillet, your family will be at the table before you even have to yell that dinner is ready. It is the ultimate solution for a quick lunch or a satisfying dinner that keeps your health goals on track while keeping your taste buds thrilled.
What is a Low Carb Cheesy Garlic Chicken Wrap?
A Low Carb Cheesy Garlic Chicken Wrap is a brilliant fusion of comfort food and smart eating. At its heart, it’s a warm, toasted tortilla packed with shredded chicken that has been tossed in a creamy, garlicky cheese blend. Unlike traditional wraps that might use heavy flour tortillas or sugary sauces, this version focuses on high-protein fillings and keto-friendly swaps. The “cheesy” part comes from a trio of mozzarella, cheddar, and cream cheese, creating a texture that is insanely rich and satisfying. The garlic isn’t just an afterthought; it’s the star of the show, providing a punchy, aromatic kick that cuts through the richness of the dairy. By using a low-carb wrap, you significantly reduce the glycemic impact of the meal, making it a fantastic choice for anyone watching their sugar intake or following a ketogenic lifestyle. It is basically a toasted sandwich’s cooler, healthier cousin that happens to be much easier to eat on the go.
Reasons to Try Low Carb Cheesy Garlic Chicken Wraps
You should absolutely try Low Carb Cheesy Garlic Chicken Wraps because they are a total lifesaver for busy schedules. First off, they are incredibly fast; we are talking twenty minutes from start to finish if you use pre-cooked chicken. Second, they are a fantastic way to use up leftovers without feeling like you are eating the “same old thing.” The combination of melted mozzarella and sharp cheddar provides a complex flavor profile that appeals to both kids and adults, making it a rare “no-argument” meal. Additionally, these wraps are highly portable, so if you are a professional eating at your desk or a mom fueling up between errands, they stay held together beautifully. The crunch of the toasted tortilla against the soft, warm interior offers a sensory experience that is just plain fun to eat. Plus, the ingredients are sturdy and affordable, meaning you can keep them on hand for those nights when grocery shopping just isn’t happening. It is a reliable, delicious, and healthy option that delivers a big reward for very little effort.
Ingredients Needed to Make Low Carb Cheesy Garlic Chicken Wraps
- 2 cups cooked chicken breast, shredded (rotisserie chicken works like magic here)
- 1 cup shredded mozzarella cheese for that iconic cheese pull
- 1/2 cup shredded cheddar cheese for a sharp, bold kick
- 2 cloves garlic, minced (measure with your heart, but two is the baseline)
- 1/4 cup cream cheese, softened to make everything velvety
- 1 tablespoon olive oil for achieving that perfect golden crust
- 4 large low-carb tortillas or wraps of your choice
- 1 tablespoon fresh parsley, chopped for a burst of color and freshness
- Salt and pepper to taste to bring all those flavors to life
- 1 handful baby spinach (optional, but a great way to sneak in some greens)
Instructions to Make Low Carb Cheesy Garlic Chicken Wraps – Step by Step
Step 1: Prep the Filling and Warm the Wraps
The first part of our Step by Step journey begins with getting your station ready so everything moves quickly. Start by preheating a large skillet or grill pan over medium heat and adding your olive oil. While that gets up to temperature, take your low-carb tortillas and wrap them in a damp paper towel, then pop them in the microwave for about 10 to 15 seconds. This is a crucial Step by Step tip because low-carb wraps can sometimes be a bit stiff; warming them makes them pliable and prevents them from cracking when you start rolling. Next, grab a large mixing bowl and toss in your shredded chicken, mozzarella, cheddar, cream cheese, minced garlic, parsley, salt, and pepper. If you decided to be a health rockstar and add spinach, throw that in now too. Mix it all together until the cream cheese has thoroughly coated every strand of chicken and the garlic is evenly distributed. You want a uniform, sticky mixture that will stay put inside the wrap.
Step 2: Assemble and Roll Like a Pro
Now we move to the next phase of the Step by Step process: assembly. Lay your warmed tortillas out on a flat surface. Divide your chicken and cheese mixture into four equal portions, which should be about a half-cup of filling per wrap. Place the filling right in the center of the tortilla, forming a bit of a log shape. Now, here is the secret Step by Step move for a secure wrap: fold the left and right sides in toward the center first, then grab the bottom edge and roll it up tightly toward the top. This “burrito style” tuck ensures that all that glorious melted cheese stays inside the wrap instead of leaking out into your pan. Make sure they are nice and snug, as a tight roll leads to a much better eating experience later on.
Step 3: Toast to Golden Perfection
The final Step by Step action happens back at the stove. Place your wraps into the hot skillet, making sure to put them seam-side down first. This is a vital Step by Step instruction because the heat will “seal” the seam shut as the cheese begins to melt, preventing the wrap from unfurling. Let them cook undisturbed for about 2 to 3 minutes. Resist the urge to poke them! You want that beautiful, golden-brown crust to form. Once the bottom is crispy, carefully flip them over with a spatula and cook for another 2 minutes on the other side. You are looking for a satisfying crunch on the outside and a completely melted, gooey center. Once they look spectacular, remove them from the heat, slice them diagonally—because everything tastes better in triangles—and serve them while they are screaming hot.
What to Serve with Low Carb Cheesy Garlic Chicken Wraps
If you want to keep things strictly keto, a fresh green salad with a zesty vinaigrette is the perfect companion to balance out the richness of the cheese. You could also serve these with a side of roasted cauliflower or some crunchy cucumber slices for a bit of texture. For those who aren’t watching carbs quite as closely, a small bowl of tomato soup makes for an incredible dipping situation, almost like a chicken-stuffed grilled cheese. If you’re feeling a bit adventurous, a side of Greek yogurt mixed with a little lime and cilantro provides a cool, tangy contrast to the warm garlic flavor. Honestly, these wraps are so filling on their own that a few simple pickles or a handful of olives might be all you need to call it a complete, successful meal.
Key Tips for Making Low Carb Cheesy Garlic Chicken Wraps
One major thing to remember is not to overstuff the wraps. It is tempting to pile on the chicken, but if the wrap is too full, it will split wide open the moment it hits the heat. Stick to the half-cup measurement for the best results. Also, make sure your cream cheese is truly softened before you start mixing; if it’s cold, you’ll end up with clumps of cheese rather than a smooth, cohesive filling. For an extra layer of flavor, try using smoked paprika or a pinch of red pepper flakes in the chicken mixture. If you have extra time, browning the minced garlic in the olive oil for 30 seconds before adding it to the bowl can give it a deeper, mellowed flavor. Finally, always use a sharp knife to cut the wraps—serrated bread knives work surprisingly well to get through the crispy exterior without squishing the soft filling inside.
Storage and Reheating Tips for Low Carb Cheesy Garlic Chicken Wraps
If you happen to have leftovers, which is a rare miracle, store them in an airtight container in the refrigerator for up to three days. To keep that “just-cooked” texture, I highly recommend reheating them in a dry skillet or an air fryer. Using a microwave will make the tortilla soft and a bit chewy, but it works in a pinch if you’re in a hurry. If you use an air fryer, set it to 350°F for about 3 to 5 minutes until the outside crisps back up. You can also assemble the wraps ahead of time and keep them in the fridge (un-toasted) for a day, then just toss them in the pan when you’re ready to eat. This makes them a fantastic option for meal prep Sundays when you want to set yourself up for a stress-free Monday lunch.
FAQs
Can I use different types of cheese? Absolutely! While mozzarella gives you the best stretch and cheddar provides great flavor, you can use pepper jack for heat or provolone for a milder, creamy vibe. Just ensure the cheese is a good melter.
Are low-carb tortillas actually healthy? Most low-carb tortillas are high in fiber, which helps lower the net carb count. They are a great tool for weight management and blood sugar control, but as with everything, moderation is key.
Can I freeze these wraps? Yes, you can freeze them! Wrap them individually in foil and place them in a freezer bag. When you’re ready to eat, let them thaw in the fridge overnight and then toast them in a pan to restore the crunch.
What can I use instead of chicken? Leftover turkey is a fantastic substitute, especially after the holidays. You could also use canned tuna or even sautéed mushrooms and peppers for a vegetarian version that still hits those savory, garlicky notes.
Final Thoughts
Low Carb Cheesy Garlic Chicken Wraps are the ultimate proof that you don’t have to sacrifice flavor to maintain a healthy lifestyle. This recipe is simple, fast, and brings a genuine sense of joy to the dinner table. Whether you are dealing with a hectic work week or just want a meal that feels like a warm hug, these wraps deliver every single time. The combination of garlic, melted cheese, and tender chicken is a timeless classic for a reason. So, the next time you feel overwhelmed by meal planning, just remember this easy, delicious solution. You deserve a meal that is both nutritious and incredibly satisfying, and these wraps are exactly that. Go ahead, give them a try tonight—your future, well-fed self will definitely thank you!
Print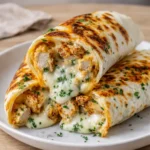
Low Carb Cheesy Garlic Chicken Wraps: Easy, Melty, and Delicious
- Prep Time: 10 minutes
- Cook Time: 10 minutes
- Total Time: 20 minutes
- Yield: 4 wraps 1x
- Category: Dinner, Lunch, Main Course
- Method: Stovetop
- Cuisine: American, Keto
Description
These low carb cheesy garlic chicken wraps are loaded with tender chicken, melty cheese, savory garlic, and wrapped in low-carb tortillas for a quick, satisfying, and keto-friendly meal.
Ingredients
- 2 cups cooked chicken breast, shredded (or rotisserie chicken)
- 1 cup shredded mozzarella cheese
- 1/2 cup shredded cheddar cheese
- 2 cloves garlic, minced
- 1/4 cup cream cheese, softened
- 1 tablespoon olive oil
- 4 large low-carb tortillas or wraps
- 1 tablespoon fresh parsley, chopped
- Salt and pepper, to taste
- 1 handful baby spinach (optional)
Instructions
1. Preheat a skillet or grill pan over medium heat and add olive oil. Warm the tortillas for 10–15 seconds in the microwave covered with a damp paper towel to prevent cracking.
2. In a large mixing bowl, combine shredded chicken, mozzarella, cheddar, softened cream cheese, minced garlic, parsley, salt, and pepper. Add spinach if using. Mix thoroughly until evenly combined and the cream cheese coats everything.
3. Divide the chicken mixture evenly among the four tortillas, placing about 1/2 cup in the center of each.
4. Roll each tortilla tightly, tucking in the sides as you go to form secure wraps.
5. Place the wraps seam-side down in the preheated skillet. Cook for 2–3 minutes per side without moving them, until golden brown and the cheese is melted.
6. Remove from the skillet, slice each wrap in half diagonally, and serve hot. Garnish with extra parsley if desired.
Notes
Avoid overfilling the wraps to prevent splitting.
Toasting the wraps ensures a crispy exterior and fully melted cheese.
Mozzarella works great, but you can experiment with other cheeses.
Warm tortillas before filling to prevent cracking.
Swap chicken for leftover turkey or add crumbled bacon for extra smoky flavor.
Nutrition
- Serving Size: 1 wrap
- Calories: 370
- Sugar: 3g
- Sodium: 620mg
- Fat: 24g
- Saturated Fat: 11g
- Unsaturated Fat: 11g
- Trans Fat: 0g
- Carbohydrates: 8g
- Fiber: 4g
- Protein: 32g
- Cholesterol: 95mg