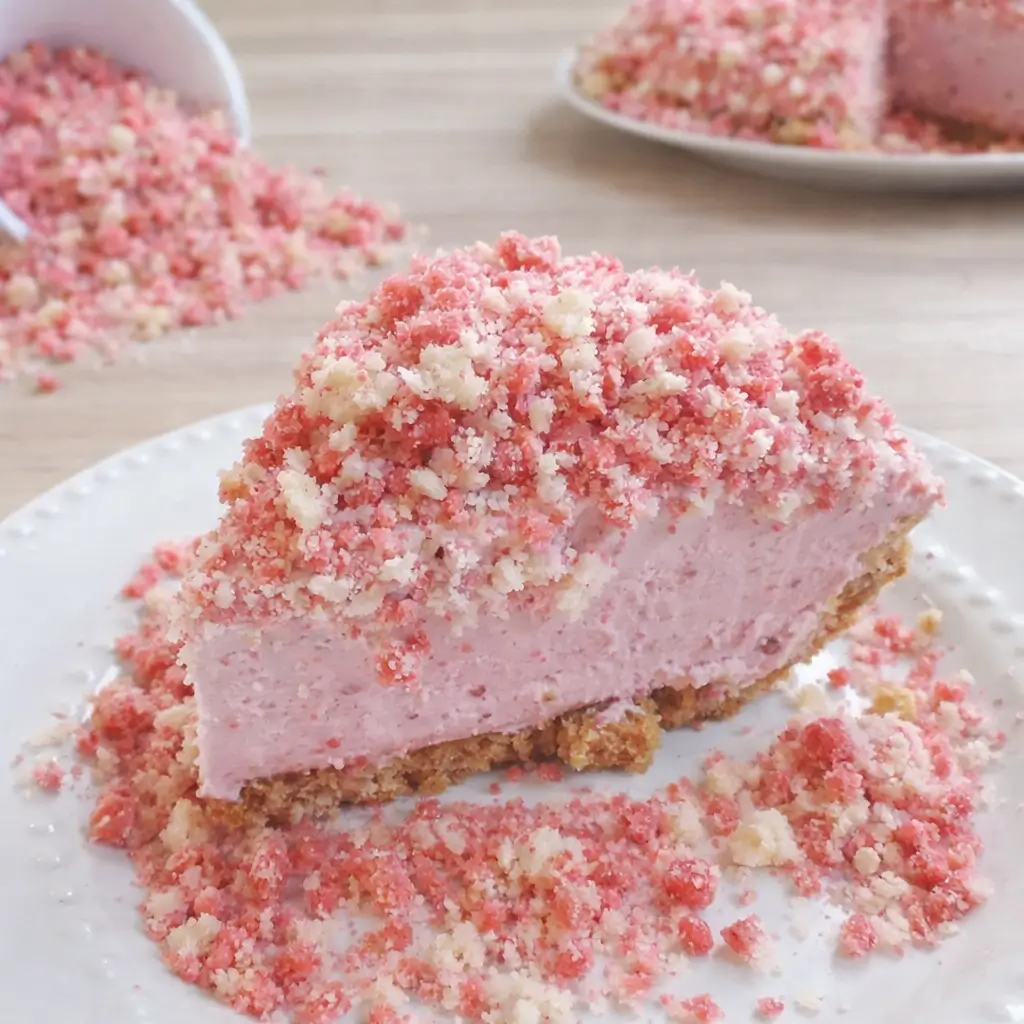
Strawberry Shortcake Freezer Pie is the dessert summer dreams are made of. Imagine creamy, no-churn strawberry ice cream nestled inside a crunchy vanilla wafer crust, topped with buttery strawberry shortcake crumbles that add just the right amount of sweetness and crunch. It’s the kind of dessert that makes you feel like you’re sitting on a porch swing with a glass of lemonade while the fireflies start to dance. The best part? This Strawberry Shortcake Freezer Pie doesn’t require fancy gadgets or hours in the kitchen.
You just need a mixer, a freezer, and a little patience (which might be the hardest part). Whether you’re making it for a backyard barbecue or just to brighten up a Tuesday, this recipe delivers cool, creamy perfection every time. It’s basically summer in a pie pan—and yes, it tastes as good as it looks.
Table of Contents
What is Strawberry Shortcake Freezer Pie?
Strawberry Shortcake Freezer Pie is a no-bake, frozen dessert that captures all the nostalgic flavors of classic strawberry shortcake, but in pie form. Instead of layers of biscuits and whipped cream, this recipe features a smooth, no-churn strawberry ice cream base made with cream cheese, whipped cream, and real strawberries. It sits in a crunchy vanilla wafer or sandwich cookie crust and is finished with homemade strawberry and vanilla crumbles that mimic that famous ice cream truck treat we all grew up loving. The result is a frozen pie that’s creamy, fruity, and perfectly balanced between rich and refreshing. It’s like a frozen cheesecake and a shortcake had a very delicious baby.
Reasons to Try Strawberry Shortcake Freezer Pie
There are about a dozen good reasons to make Strawberry Shortcake Freezer Pie, but let’s start with the big ones. First, it’s no churn—no ice cream maker, no fuss. You get all that smooth, creamy ice cream texture just by whipping and folding. Second, it’s a make-ahead dessert, meaning you can whip it up a day or two before you need it and look effortlessly put-together when guests arrive. Third, it’s ridiculously pretty. The pink hue of the strawberry filling and the golden crumble topping are the kind of colors that make your dessert table look like a magazine spread. And finally, it’s customizable.
You can use a store-bought crust or make a gluten-free version. You can even mix and match the crumble flavors for fun twists. If you love recipes like Easy Strawberry Cupcakes or Strawberry Cheesecake Cookies, this pie will absolutely steal your heart.
Ingredients Needed to Make Strawberry Shortcake Freezer Pie
For the Strawberry Freezer Pie Filling, you’ll need:
- 1 cup heavy whipping cream
- ¼ cup powdered sugar
- 1 can sweetened condensed milk
- 4 ounces cream cheese, room temperature
- 2 cups strawberry puree (measured after pureeing; reduce by ½ cup for a creamier texture)
- 1 prepared 10-inch vanilla wafer or sandwich cookie crust
For the Strawberry Crumbles:
- One 3-ounce box strawberry-flavored gelatin
- ½ cup all-purpose flour (use gluten-free flour for GF version)
- ¼ cup butter
For the Vanilla Crumbles:
- ½ cup all-purpose flour
- ¼ cup butter
- ¼ cup sugar
- 1 teaspoon vanilla extract
Optional Substitutes: You can replace the vanilla crumble mix with a 3-ounce box of vanilla instant pudding (omit the sugar and vanilla in that case). For gluten-free crusts, you can use crushed gluten-free sandwich cookies or ground cereal like Cheerios Oat Crunch or Puffins mixed with melted butter.
Instructions to Make Strawberry Shortcake Freezer Pie – Step by Step
Step 1: Make the Strawberry and Vanilla Crumbles
Let’s start with the fun part—the strawberry shortcake crumbles. Preheat your oven to 350°F and line a baking sheet with parchment paper. In one bowl, mix the strawberry gelatin, flour, and butter using a fork until the texture looks like coarse crumbs. In a separate bowl, mix flour, sugar, butter, and vanilla for the vanilla crumbles. Sprinkle each crumble mixture on opposite sides of your baking sheet so they bake evenly without blending together.
Pop them in the oven for 7 to 8 minutes—just enough to toast the edges slightly. Do not stir or overbake; they’ll firm up as they cool. Let them cool completely, at least an hour. If they’re still warm, chill them in the fridge. Once cool, break apart any big clumps with your hands or a rolling pin. You’ll end up with about 3 cups of sweet, buttery crumble goodness that’ll become your pie’s crowning glory.
Step 2: Whip the Cream (the Heart of the Filling)
In a large mixing bowl, use an electric mixer to beat the heavy whipping cream and powdered sugar together until stiff peaks form. You’ll know it’s ready when the cream holds its shape like fluffy clouds. This whipped cream is what gives the pie its light, airy texture—so don’t rush this step. Once whipped, set the bowl in the fridge to keep it cold while you move on to the next step.
Step 3: Make the Creamy Strawberry Base
In another large bowl, beat the softened cream cheese until completely smooth and lump-free. Add the sweetened condensed milk and mix for another minute until everything is creamy and blended. Now comes the flavor—pour in your strawberry puree and beat until well combined. The mixture should turn a gorgeous pink color and smell like summer.
Step 4: Combine the Two Mixtures
Take your chilled whipped cream out of the fridge and gently fold it into the strawberry-cream cheese mixture. Use a spatula and take your time. Folding (instead of stirring) keeps the mixture light and fluffy, which is the secret to that dreamy no-churn ice cream texture. Once combined, it should look thick, silky, and irresistible—try not to eat it all straight from the bowl!
Step 5: Fill the Pie Crust
Grab your prepared vanilla wafer crust (store-bought or homemade). Pour the strawberry mixture into the crust, spreading it evenly with a spatula. If you’re using a 9-inch crust, you might have a little extra filling—no problem, just freeze it separately for a little chef’s treat later. Smooth the top, cover it lightly with plastic wrap, and place it in the freezer. Freeze for at least 4 to 5 hours, or until the pie is firm all the way through.
Step 6: Add the Strawberry Shortcake Crumble Topping
Once the pie is frozen solid, take it out of the freezer and let it thaw for about 10 minutes before serving. This gives it the perfect creamy texture. Then sprinkle a generous layer of the strawberry and vanilla crumbles all over the top. Don’t be shy—cover it completely for that classic shortcake crunch. Press them down lightly so they stick to the top of the pie.
Step 7: Slice, Serve, and Savor
Using a sharp knife dipped in warm water (for clean slices), cut the pie into wedges and serve immediately. The creamy strawberry filling with the buttery crumbles on top is pure magic. You can even drizzle a bit of strawberry syrup on top if you want to go all out. Pair it with a cup of coffee or iced tea, and you’ve got the perfect summer dessert.
If you loved this recipe, you might also enjoy our Strawberry Butter Swim Biscuits or Berry Puff Twists—both capture that same fruity, comforting vibe.
What to Serve with Strawberry Shortcake Freezer Pie
Strawberry Shortcake Freezer Pie pairs beautifully with light summer sides or refreshing drinks. Try it after a grilled dinner or alongside a tangy Creamy Seafood Salad for a delightful contrast. It also shines when served with a glass of sparkling lemonade, fresh mint tea, or a scoop of vanilla bean ice cream for extra indulgence.
Key Tips for Making Strawberry Shortcake Freezer Pie
- Whip the cream properly. Over- or under-whipping can change the texture. You want stiff peaks—no more, no less.
- Cool the crumbles completely. Warm crumbs will melt into the filling instead of staying crisp.
- Use real strawberries. Frozen strawberries can work, but fresh ones give a brighter, fresher flavor.
- Freeze long enough. Four hours minimum—overnight is even better for clean slices.
- Get creative. Add a drizzle of white chocolate or swirl of strawberry sauce before freezing for a gourmet twist.
Storage and Reheating Tips for Strawberry Shortcake Freezer Pie
Store your Strawberry Shortcake Freezer Pie tightly covered in the freezer for up to 2 weeks. If it’s already topped with crumbles, wrap it gently in plastic wrap and foil to prevent freezer burn. To serve again, let it sit at room temperature for 10–15 minutes before slicing. Never microwave it—it’ll ruin that creamy texture. If you have leftover crumble topping, store it in an airtight jar at room temperature for up to 5 days and sprinkle it on yogurt or ice cream for a quick treat.
FAQs
Can I make this pie gluten-free?
Absolutely! Swap the all-purpose flour for gluten-free flour and use gluten-free cookies or cereal for the crust.
Can I use frozen strawberries?
Yes, just thaw and drain them before pureeing to avoid excess moisture.
Can I make it ahead?
Definitely—it’s a freezer pie! You can make it several days ahead and just add the crumble topping before serving.
Can I use Cool Whip instead of homemade whipped cream?
You can, but the texture will be slightly different. Homemade whipped cream gives it that extra lusciousness.
Final Thoughts
Strawberry Shortcake Freezer Pie is the dessert you’ll find yourself coming back to every summer. It’s simple, stunning, and downright delicious. With its creamy strawberry filling, buttery crumbles, and cool, refreshing texture, it’s one of those desserts that brings everyone to the table smiling. Whether you’re hosting a family dinner or just treating yourself after a long day, this pie delivers sweet satisfaction in every bite. For more creamy dessert inspiration, check out our Easy Strawberry Cupcakes or Cheesy Mushroom Ravioli Casserole for a comforting meal before dessert.
Visit our Pinterest for regular slow cooker recipe updates, or join our Facebook discussions where cooking fans exchange their favorite hearty meal ideas.
Print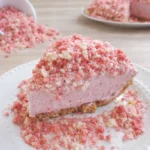
Strawberry Shortcake Freezer Pie: A No-Churn Summer Dream
- Prep Time: 15 minutes
- Cook Time: 0 minutes
- Total Time: 45 minutes
- Yield: 4 servings 1x
- Category: Salad
- Method: No-Cook
- Cuisine: American
Description
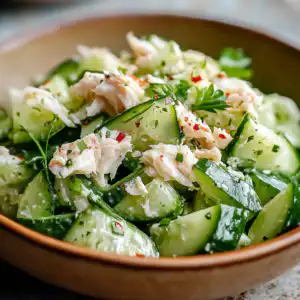
Cold, creamy seafood salad made with shredded imitation crab, crisp celery, sweet corn, and a tangy lemon-mayo dressing. Perfect as a light lunch, sandwich filling, or party appetizer.
Ingredients
- 1 lb imitation crab meat, shredded into chunks
- 1 cup mayonnaise
- 1 Tbsp fresh lemon juice
- 1 tsp Dijon mustard
- 1/2 cup celery, finely diced
- 1/4 cup red onion, minced
- 1/2 cup corn kernels (drained if canned)
- Salt and black pepper, to taste
- 1 Tbsp fresh dill, chopped (optional)
- Lettuce leaves, for serving
Instructions
1. In a large mixing bowl, combine mayonnaise, lemon juice, and Dijon mustard. Mix until smooth.
2. Break imitation crab into bite-sized chunks and gently fold into the mayo mixture.
3. Add diced celery, minced red onion, and corn. Stir gently to distribute evenly.
4. Season with salt and black pepper. Taste and adjust seasoning as needed. Add fresh dill, if using.
5. Cover and refrigerate for at least 30 minutes, preferably 1 hour or longer to let flavors meld.
6. Serve cold over lettuce leaves, in sandwiches, or with crackers.
Notes
Use half mayonnaise and half Greek yogurt for a lighter version.
Dice vegetables finely for the best texture.
This salad is best made ahead—flavors improve after a few hours in the fridge.
Store in an airtight container in the refrigerator for 3–4 days.
Optional add-ins: halved grapes, diced apples, chopped hard-boiled eggs, or cooked shrimp.
Always serve cold. If serving outdoors, keep chilled over ice.
Nutrition
- Serving Size: 1 cup
- Calories: 320
- Sugar: 3g
- Sodium: 520mg
- Fat: 28g
- Saturated Fat: 5g
- Unsaturated Fat: 20g
- Trans Fat: 0g
- Carbohydrates: 9g
- Fiber: 1g
- Protein: 10g
- Cholesterol: 35mg