Love Letter Cake isn’t just a dessert—it’s a whole mood. Imagine tiny edible envelopes sealed with candy hearts, whispering “I love you” in the sweetest way possible. These mini love letter cakes are rich, chocolatey, and almost too cute to eat (almost). Whether you’re celebrating Valentine’s Day, an anniversary, or just want to surprise someone special “just because,” this recipe will melt hearts faster than buttercream on a summer day. Best part? You don’t need to be a professional baker to pull it off.
With simple steps and a touch of creativity, you can whip up these mini cakes that look like they came straight from a bakery window. Keep reading—because this is one love letter you’ll actually want to write… with frosting.
Table of Contents
What is Love Letter Cake?
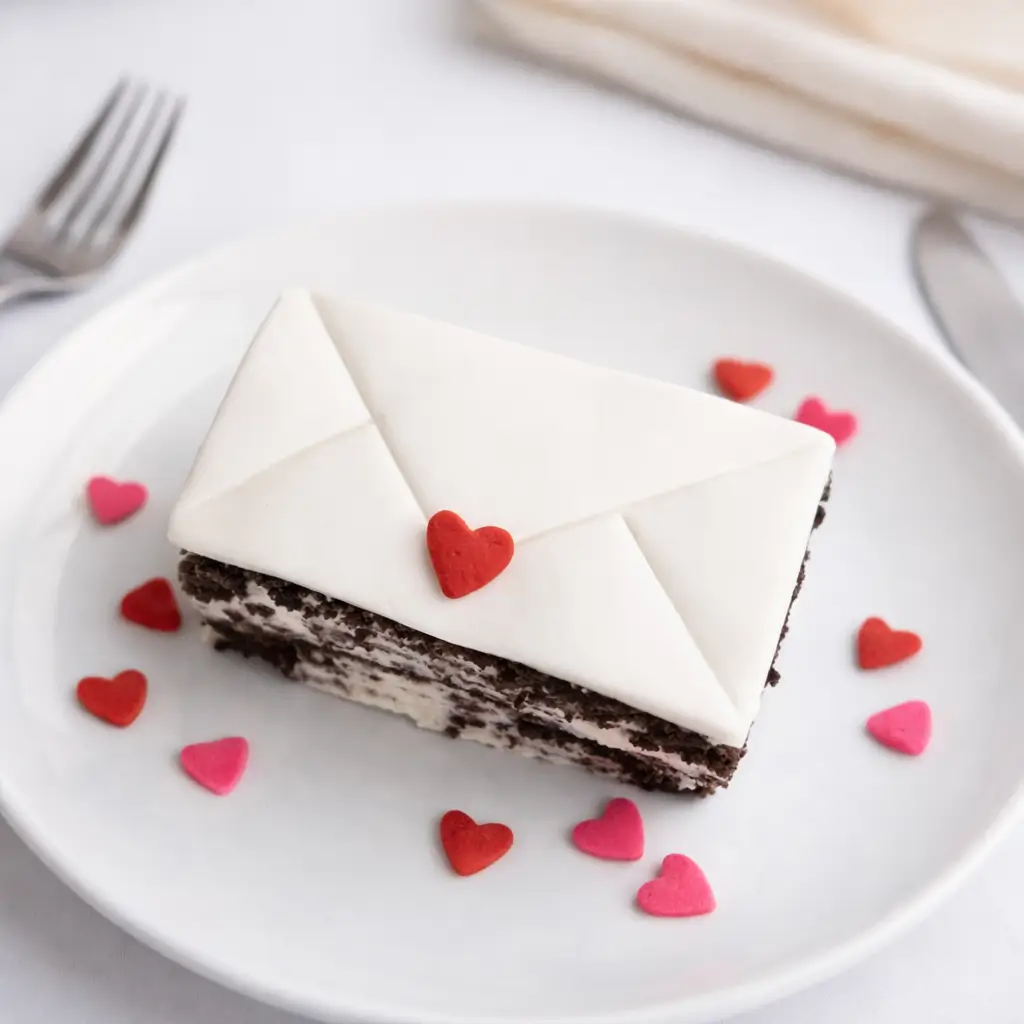
A Love Letter Cake is a charming little dessert shaped like a sealed envelope, made with layers of moist chocolate cake, buttercream frosting, and a glossy fondant “envelope.” Each one is finished with a tiny candy heart, like a sweet stamp of affection. The inspiration comes from the nostalgia of handwritten love notes—those days when words were sealed in envelopes instead of sent through texts. These mini cakes turn that feeling into something edible and utterly delightful. Think of it as a way to bake affection into every bite—perfect for gifting to your partner, friends, or even as an adorable favor for a wedding or engagement party.
Reasons to Try Love Letter Cake
If you’re looking for a dessert that’s romantic and easy, Love Letter Cake is your answer. First, it’s visually stunning—each mini cake looks like it belongs on a Pinterest board. Second, it’s surprisingly quick to make, even if you’re not a baking whiz. You can use your favorite chocolate cake recipe or a boxed mix if you’re in a rush (no judgment here).
The strawberry jam layer adds a little fruity brightness that cuts through the richness of the chocolate and buttercream. Finally, they’re perfectly portioned—so no awkward cake-cutting moments at your dinner date. It’s the kind of dessert that says, “I thought of you” without saying a word. For more Valentine-worthy treats, check out our Heart Funfetti Cookie Cake Bars and Valentine Red Velvet Whoopie Pies.
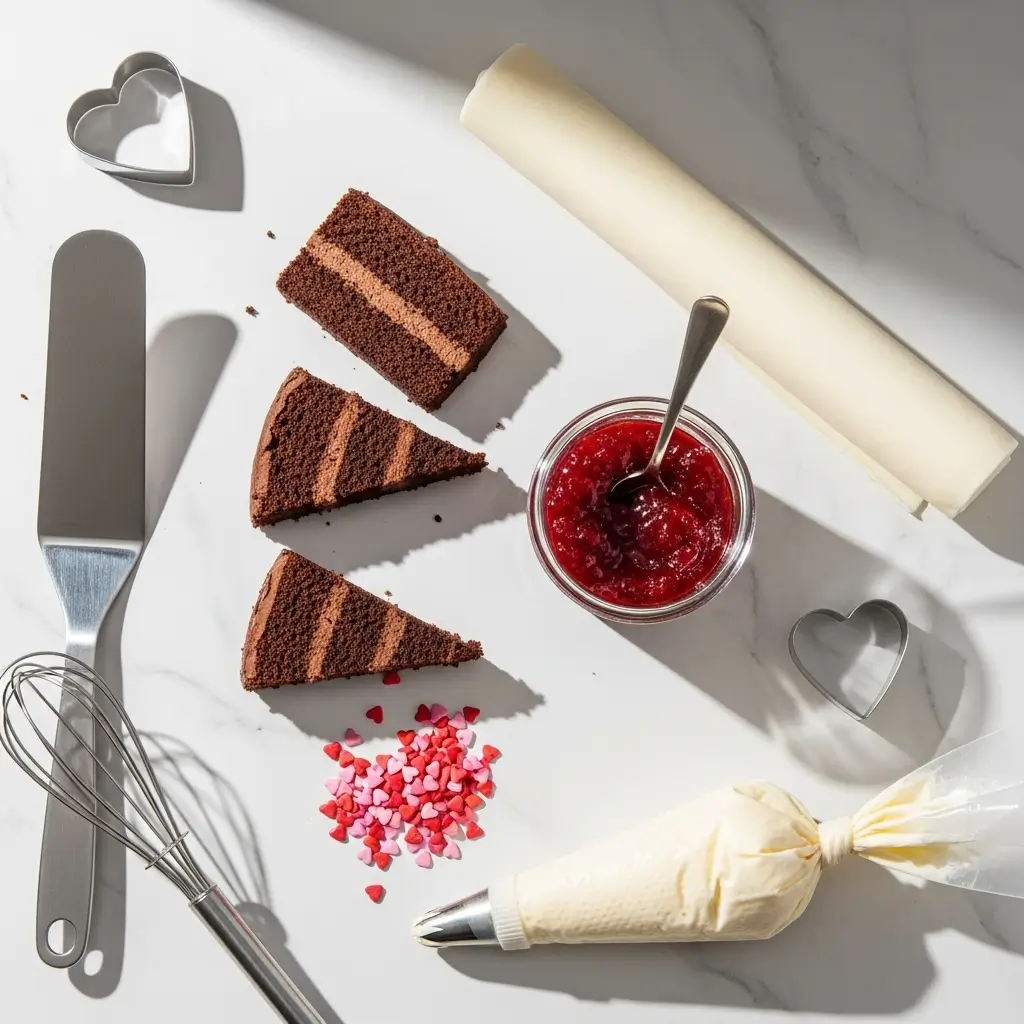
Ingredients Needed to Make Love Letter Cake
- 2 chocolate cake rounds (8-inch)
- 1 cup white chocolate buttercream frosting
- ½ cup homemade or store-bought strawberry jam (seedless preferred)
- ¼ cup heart sprinkles (pink or red)
- 1 cup white marshmallow fondant
Instructions to Make Love Letter Cake
Creating a Love Letter Cake might look fancy, but don’t let that fool you—this step-by-step guide makes it approachable for anyone, even if you’re new to baking. Follow along as we walk through each stage carefully, from baking the base to adding those sweet envelope details. By the end, you’ll have a batch of mini cakes that not only look romantic but taste absolutely divine.
Step 1: Bake and Cool the Cake Layers
Let’s start with the foundation. Begin by baking your favorite chocolate cake recipe—whether from scratch or a trusted box mix. If you need inspiration for a tender, rich base, try the chocolate cake used in our Red Velvet Cheesecake Brownies. Bake two 8-inch rounds and allow them to cool completely on a wire rack. Cooling is crucial in this step-by-step process because warm cake layers can cause your buttercream to melt and make assembly messy. Pro tip: pop your cooled cakes in the fridge for 20 minutes before slicing—they’ll firm up just enough for clean, even cuts.
Step 2: Layer with Buttercream
Once your cakes are cool, use a long serrated knife to slice each round in half horizontally. This gives you four thin layers. Spread a generous amount of white chocolate buttercream between each layer, gently pressing down so the frosting spreads evenly. The buttercream acts like a glue, holding your cake layers together while adding that irresistible creamy sweetness. If you’d like your buttercream to be a bit lighter, check out our guide in the Strawberry No-Bake Cake Balls for tips on adjusting texture and flavor.
Step 3: Chill and Slice into Mini Rectangles
Next, chill the frosted cake for about one hour. Chilling makes the cake easier to cut—a small but mighty trick in this step-by-step process. After the hour is up, remove the cake from the fridge and use a sharp knife to slice it into small rectangular pieces, roughly the size of a love letter envelope (about 2×3 inches). Try to keep the cuts even for a professional finish. Don’t rush this part—clean cuts make a huge difference when you add the fondant later.
Step 4: Spread a Sweet Jam Layer
Now comes a fruity twist. Take each rectangle and spread a thin, even layer of strawberry jam on top. Seedless jam works best here—it keeps the surface smooth for the fondant layer. The jam not only adds a burst of bright flavor but also helps the fondant stick. If you’re looking for more ideas on pairing fruit with chocolate, you’ll love our Chocolate Covered Strawberries—they share that same luscious combination of rich and tangy.
Step 5: Roll and Apply the Fondant
Dust your counter lightly with powdered sugar to prevent sticking, then roll out the white marshmallow fondant until it’s about ¼ inch thick. This is the “paper” of your edible envelope. Gently lift a fondant sheet and place each cake rectangle, jam-side down, on top. Using a small knife, trim away the excess fondant around the edges. Smooth the surface gently with your hands or a fondant smoother, pressing lightly so it adheres to the jam underneath. This part of the step-by-step process gives your mini cakes their signature polished look.
Step 6: Create the Envelope Design
To mimic the details of an envelope, take a clean paring knife or fondant tool and score two diagonal lines that meet in the center of the top edge, forming a subtle “V.” Then score a straight line across the bottom to complete the flap. Don’t press too hard—you’re marking, not cutting. If you’ve never worked with fondant before, you can find helpful shaping and smoothing techniques in our Heart Macarons tutorial.
Step 7: Seal It with a Heart
Finally, the sweetest part—add your little love seal. Dab a tiny bit of buttercream or jam in the center where your lines meet and press a heart-shaped sprinkle on top. It’s the small detail that transforms your mini cakes into adorable edible envelopes. If you want to personalize further, you can even pipe initials or short words with tinted icing for that custom touch.
Step 8: Chill and Serve
Place your finished cakes in the fridge for about 15–20 minutes before serving. This quick chill helps the fondant set and gives each Love Letter Cake that picture-perfect finish. When it’s time to serve, let them rest at room temperature for 10 minutes so they’re soft and melt-in-your-mouth delicious.
And that’s it! You’ve just created your very own Love Letter Cakes step by step, from the first crumbly slice to the final heart seal. These mini desserts are perfect for gifting, sharing, or pairing with a cozy cup of coffee after a romantic dinner. If you enjoyed this baking project, you might also love our other Valentine’s-themed recipes like Strawberry Cream Cheese Heart Puffs or Valentine’s Day Fudge.
What to Serve with Love Letter Cake
These cakes pair beautifully with something bubbly—champagne, sparkling rosé, or even a pink lemonade for a non-alcoholic option. They’re rich enough to stand alone but also shine alongside light desserts like Strawberry Jello Pie or No-Bake Strawberry Cheesecake Bars. If you’re planning a full Valentine’s spread, add something savory like Marry Me Chicken for a meal that ends on a romantic high note.
Key Tips for Making Love Letter Cake
- Chill before cutting. A cold cake is easier to slice cleanly and won’t crumble.
- Keep fondant soft. If your fondant feels dry, microwave it for just a few seconds to soften it before rolling.
- Uniformity matters. Use a ruler or cookie cutter to keep your mini cakes even in size—it helps them look polished.
- Short on time? Use store-bought frosting and jam. The presentation does most of the work here.
- Play with colors. Swap the white fondant for pastel pink or red for a fun twist.
Storage and Reheating Tips for Love Letter Cake
Store your mini cakes in an airtight container at room temperature for up to 2 days or refrigerate for up to 5 days. If refrigerated, let them sit out for about 30 minutes before serving so the fondant softens slightly. Avoid microwaving (trust me, melted fondant is not a good look). For longer storage, you can freeze the unfrosted chocolate cake layers for up to a month—just thaw overnight in the fridge before assembling.
FAQs
Can I use a boxed cake mix?
Absolutely! Choose a rich chocolate flavor for the best contrast with the fondant.
Do I need to use fondant?
Nope—you can use white buttercream and pipe the envelope lines if fondant isn’t your thing.
Can I make these ahead of time?
Yes, you can assemble them a day ahead. Just keep them covered to prevent the fondant from drying out.
What if I don’t have heart sprinkles?
Try using a small candy heart, a sugar pearl, or even a dot of red frosting—it’ll still look adorable.
Final Thoughts
This Love Letter Cake recipe isn’t just about baking—it’s about creating a memory. Each mini cake is a small gesture of love that feels personal and heartfelt, whether you’re surprising your sweetheart, your kids, or even treating yourself. They’re bite-sized, easy to make, and guaranteed to earn a few happy sighs and maybe even a kiss or two. Want more romantic dessert ideas? Don’t miss our Strawberry Cream Cheese Heart Puffs—they’re another sweet way to say “I love you.”
Visit our Pinterest for regular slow cooker recipe updates, or join our Facebook discussions where cooking fans exchange their favorite hearty meal ideas.
Print
Love Letter Cake – A Romantic Mini Dessert for Valentine’s Day
- Prep Time: 10 minutes
- Cook Time: 45 minutes
- Total Time: 1 hour 15 minutes
- Yield: 12 mini cakes 1x
- Category: Cake, Dessert
- Method: Baking
- Cuisine: American
Description
Use this cake decorating tutorial to make easy mini love letter cake. Great for Anniversaries or Valentine’s Day and can be used as Wedding party favors.
Ingredients
- 2 Chocolate cake rounds, 8 inch
- 1 cup White chocolate buttercream frosting
- ½ cup Easy homemade strawberry jam
- ¼ cup Heart sprinkles (pink or red)
- 1 cup Marshmallow fondant (white)
Instructions
1. Bake the chocolate cakes and allow them to cool down.
2. Cut each cake in half and fill it with buttercream icing.
3. Use a sharp knife to cut small, evenly sized rectangular pieces.
4. Tip: Chilling the cake for an hour really makes slicing easier.
5. Spread a thin coating of seedless strawberry jam on top of each rectangular cake piece.
6. Roll out white fondant and place the jam-side down onto the fondant.
7. Cut off excess fondant around the cake with a knife.
8. Gently press the knife on top of the fondant to indent all the envelope details.
9. Stick a small heart sprinkle in the center using a dab of frosting. Enjoy!
Notes
Read all tips above before starting for best results.
Chilling the cake before slicing helps with cleaner cuts.
Use gel food coloring to tint fondant if desired.
Nutrition
- Serving Size: 1 mini cake
- Calories: 460
- Sugar: 52g
- Sodium: 638mg
- Fat: 14g
- Saturated Fat: 3g
- Carbohydrates: 83g
- Fiber: 1g
- Protein: 4g