Churro Cheesecake — just saying it feels like a hug for your taste buds. This dessert brings together two all-time favorites: the crunchy, cinnamon-sugar bliss of a churro and the creamy, dreamy richness of a cheesecake. If you’ve ever stood in line at a fair, cinnamon sugar wafting through the air, and thought, “I wish this feeling came in bar form,” this is your answer. Perfect for potlucks, family get-togethers, or when you just want something indulgent without too much fuss, Churro Cheesecake is easy, nostalgic, and totally irresistible.
Table of Contents
What is Churro Cheesecake?
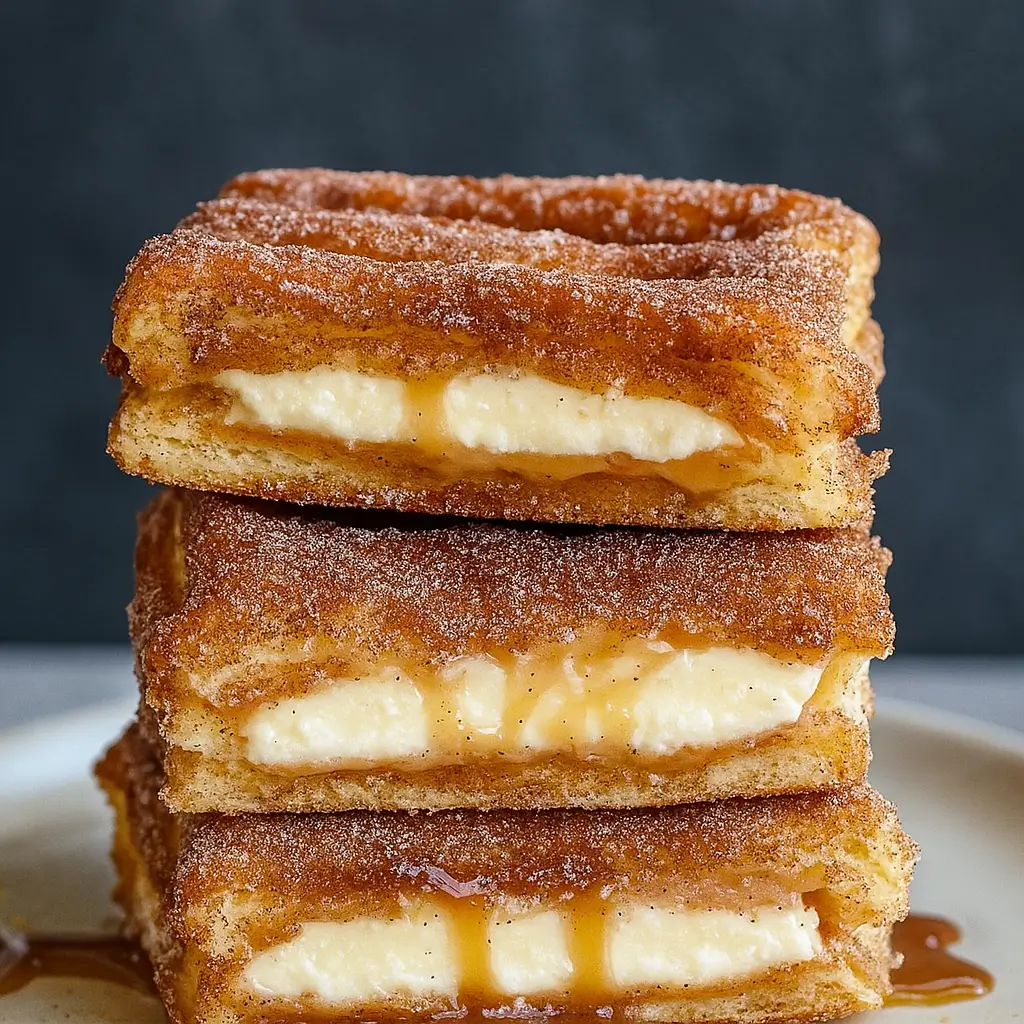
Churro Cheesecake is the delicious mash-up of two classic desserts that never fail to please. Imagine layers of buttery crescent dough hugging a smooth, vanilla-scented cheesecake filling. The magic happens when cinnamon sugar caramelizes on top during baking, creating that signature churro crunch. Once chilled, each bite gives you the contrast of crisp edges, velvety cream cheese filling, and that cozy cinnamon sweetness that feels like home. It’s a Mexican-American fusion dessert that’s both crowd-pleasing and beginner-friendly — no water baths or springform pans needed. Just simple ingredients and a little love, straight from your kitchen to dessert heaven.
Reasons to Try Churro Cheesecake
Here’s why this Churro Cheesecake recipe deserves a permanent spot in your dessert rotation. First, it’s ridiculously simple. No fancy tools or complicated steps — if you can open a can of crescent dough, you can make this. Second, it’s the ultimate comfort food: warm, sweet, buttery, and slightly crunchy with a creamy middle that melts in your mouth. Third, it’s great for sharing — though you might secretly hope no one asks for seconds. Lastly, this recipe delivers that “wow” factor without hours of work. Whether you’re hosting a weekend brunch or just want something sweet to unwind with, this churro-inspired cheesecake guarantees smiles all around.
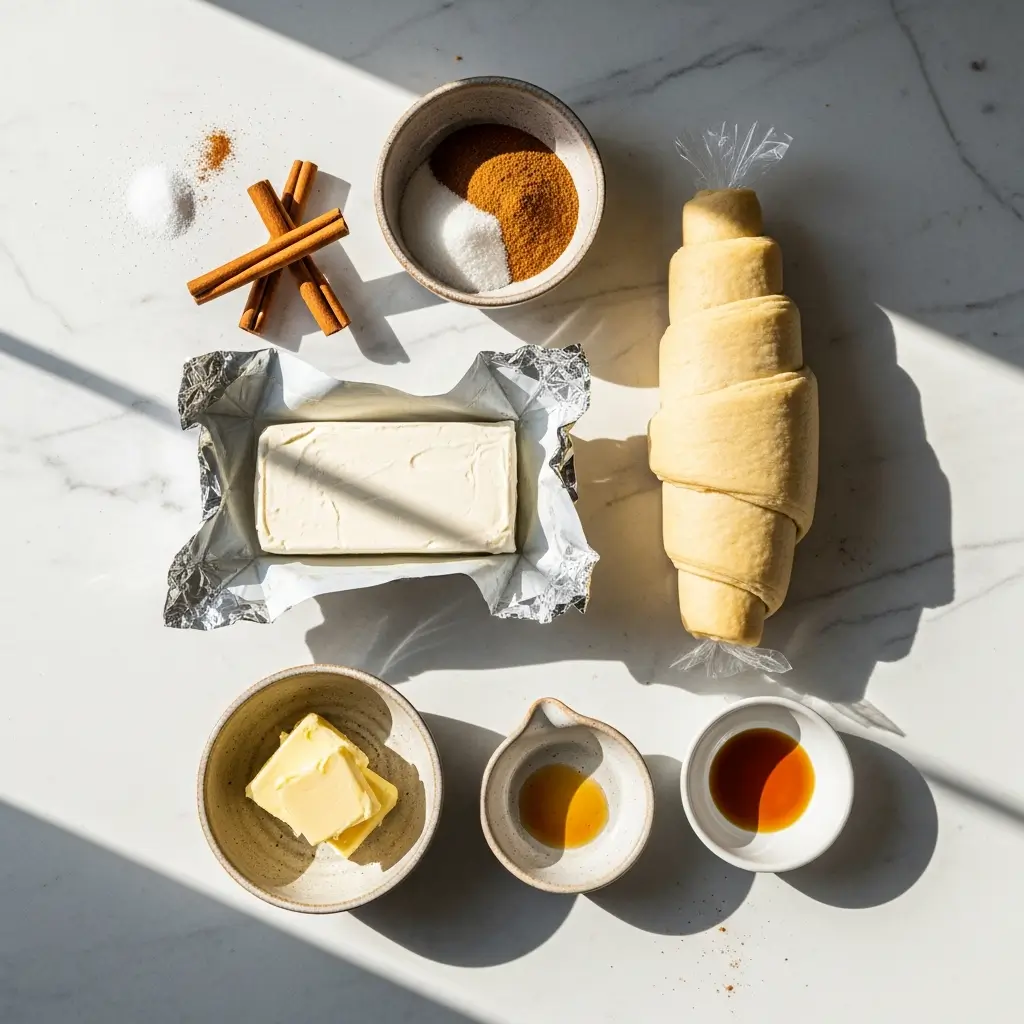
Ingredients Needed to Make Churro Cheesecake
Cinnamon Sugar:
- 1 tablespoon ground cinnamon
- ½ cup granulated sugar
Cheesecake Bars:
- Two 8-ounce packages refrigerated crescent roll dough or sheets
- 16 ounces full-fat cream cheese, softened
- ¾ cup granulated sugar
- 1 large egg
- 1½ teaspoons vanilla extract
- 3 tablespoons unsalted butter, melted and slightly cooled
Instructions to Make Churro Cheesecake
If you’ve ever wished someone would walk you through dessert baking step by step, like a friendly kitchen buddy cheering you on — this is it. Making Churro Cheesecake isn’t complicated, but a few little tricks make all the difference between “good” and “oh-my-goodness-please-don’t-let-this-end.” So tie on that apron, preheat the oven, and let’s dive into this step-by-step process that guarantees a golden, cinnamon-kissed cheesecake bar you’ll be proud to share (or keep entirely to yourself — no judgment).
Step 1: Mix the Cinnamon Sugar Magic
Let’s start with the signature churro flavor — that heavenly mix of cinnamon and sugar. In a small bowl, combine 1 tablespoon of ground cinnamon with ½ cup of granulated sugar. Stir it well until you see that light brown shimmer that promises delicious things ahead. This mix will do double duty — some goes at the bottom for a subtle sweetness, and the rest crowns the cheesecake with a perfect caramelized crunch.
If you love experimenting with spice, check out our Honey Cinnamon Oatmeal Bread — it’s another cozy treat that celebrates cinnamon’s warm charm.
Step 2: Preheat the Oven and Prepare Your Pan
Preheat your oven to 350°F (175°C) and position the rack in the middle. Grab a 9×13-inch baking pan, and lightly grease it with butter or nonstick spray. Now for a pro-level move — sprinkle about 1–2 tablespoons of your cinnamon sugar evenly across the greased surface. This step not only prevents sticking but also adds a gorgeous sweet crust to the bottom of your bars.
(Pro tip: Want more insight on prepping pans the right way? See our handy baking preparation guide for tips that make cleanup a breeze.)
Step 3: Create the Crescent Dough Base
Open your first tube of crescent roll dough — carefully, unless you enjoy a minor heart attack from that signature pop! Gently unroll it and press the seams together to form one smooth sheet. Fit it into the bottom of your prepared pan, stretching lightly to cover every corner. This bottom layer will bake into a buttery, flaky base that perfectly supports the creamy filling.
If you can find the crescent dough sheets (without seams), go for those — they make life easier. For substitutions, check out our article on easy dough swaps to see how puff pastry can also work in a pinch.
Step 4: Whip Up the Cheesecake Filling
Here’s where the “cheesecake” part comes in — and trust me, it’s worth it. In a large bowl, beat together 16 ounces of softened cream cheese, ¾ cup of sugar, 1 large egg, and 1½ teaspoons of vanilla extract. Use an electric mixer for about 2–3 minutes, or until it’s silky smooth and lump-free.
Make sure your cream cheese is fully softened before you start — cold cream cheese can lead to a grainy texture (and no one wants that). You should end up with a luscious, velvety batter that practically begs to be spread over the dough.
If you love making creamy desserts, you’ll also adore our Creamy Chicken Pot Pie Orzo — it’s savory, not sweet, but the texture lesson is the same: soft ingredients = smooth results.
Step 5: Layer the Cheesecake Filling
Pour the cheesecake mixture over the crescent dough base. Use a spatula to spread it evenly, making sure it reaches all edges. The goal is a smooth, level layer that will bake evenly into a creamy middle. Don’t worry if you get a few air bubbles — they’ll disappear in the oven’s warmth.
Take a moment to appreciate the simplicity here — no water bath, no fuss, just pure comfort food elegance.
Step 6: Add the Top Dough Layer
Unroll your second tube of crescent dough, seal any seams, and gently place it over the cheesecake filling. You can lift it in sections if needed — it’s delicate, but forgiving. Lightly stretch to cover the top completely, then press the edges down to seal the layers together.
Now you’ve got the perfect sandwich: buttery dough, creamy filling, and a little suspense waiting for that final bake.
Step 7: Brush with Melted Butter
Take 3 tablespoons of melted butter, slightly cooled, and drizzle or brush it evenly over the top layer. This buttery coating is what helps the cinnamon sugar caramelize into that irresistible churro crust. Use a pastry brush for even coverage — think of it as giving your dessert a spa treatment in butter.
Step 8: Sprinkle with Cinnamon Sugar Topping
Generously sprinkle the remaining cinnamon sugar over the buttered top. Don’t hold back — this is where the magic happens. The sugar will melt into the butter, creating a crackly, golden topping that gives every bite that authentic churro crunch.
If you love a little extra texture, toss in some crushed pecans or even a pinch of sea salt for a sweet-salty twist (you can find more flavor ideas in our fall dessert inspiration collection).
Step 9: Bake to Golden Perfection
Slide your pan into the preheated oven and bake for 26–30 minutes. You’ll know it’s ready when the top is puffed and beautifully golden brown. The scent of cinnamon and butter will fill your kitchen — the kind of aroma that makes everyone suddenly “check in” on dessert progress.
When done, transfer the pan to a wire rack and let it cool completely.
Step 10: Chill and Slice Like a Pro
Once your cheesecake reaches room temperature, cover the pan and refrigerate for at least 3 hours. This chill time helps the layers set, making it easy to cut clean, beautiful bars.
To serve, use a sharp knife (wiping between cuts for neat edges), and slice into squares or rectangles. You can serve them cold for a firm texture or slightly warm them for that melt-in-your-mouth creaminess.
Top with a drizzle of caramel sauce or a dollop of whipped cream if you’re feeling fancy — and for a complete sweet spread, pair it with a refreshing Autumn Apple Salad to balance out the richness.
Step-by-Step Summary for Success:
- Mix your cinnamon sugar first.
- Layer dough, filling, and topping carefully.
- Bake until golden, chill until firm.
- Serve with joy (and maybe a little extra cinnamon dust).
Each step in this step-by-step churro cheesecake recipe builds toward that final bite of creamy, crunchy perfection. And the best part? You can make it in under an hour (plus chill time) and look like a dessert pro.
(For more easy dessert ideas like this one, visit We Enjoy Meals — where comfort food meets real life.)
What to Serve with Churro Cheesecake
Churro Cheesecake is rich and sweet, so it pairs wonderfully with simple sides. Fresh berries add brightness, while a drizzle of caramel or chocolate sauce gives it that dessert-bar decadence. If you’re serving at brunch, a hot latte or spiced chai makes the perfect companion. For a dinner party, serve small squares with a scoop of vanilla ice cream or alongside Honey Cinnamon Oatmeal Bread for a cozy dessert spread.
Key Tips for Making Churro Cheesecake
Use softened cream cheese — no shortcuts. Cold cream cheese can make your filling lumpy. Press those crescent seams firmly to avoid leaks, and make sure your butter is slightly cooled before brushing so it doesn’t melt through the dough. For a crispier top, broil for the last minute (watch closely!). Chill time is key; it allows layers to firm up, making slicing a breeze. And here’s a fun idea: sprinkle crushed pecans or a dash of cayenne in the cinnamon sugar mix for a bold twist.
Storage and Reheating Tips for Churro Cheesecake
Store leftover bars in an airtight container in the fridge for up to four days. They taste great cold, but if you prefer them warm, pop one in the microwave for 10–12 seconds. To freeze, wrap individual bars in plastic and store in a freezer-safe bag for up to three months. Thaw overnight in the fridge before serving. For gatherings, make it a day ahead — it actually tastes better after chilling overnight.
FAQs
Can I use puff pastry instead of crescent dough? Yes, though it’ll be flakier and less chewy — still delicious!
Can I double the recipe? Absolutely. Just use a larger baking dish and adjust baking time slightly.
How do I prevent soggy bottoms? Sprinkle a little cinnamon sugar under the bottom dough layer — it creates a sweet barrier.
Can I make it ahead? Yes! It’s even better the next day after the flavors meld together.
Final Thoughts
If you’re craving something sweet but don’t want to spend all day in the kitchen, Churro Cheesecake is your dessert soulmate. It’s nostalgic, simple, and so satisfying that even picky eaters will ask for seconds. With its buttery crust, creamy center, and irresistible cinnamon topping, it’s proof that great desserts don’t have to be complicated. For another cozy, cinnamon-forward treat, check out our Cinnamon Sweet Potato Breakfast Cookies.
Visit our Pinterest for regular slow cooker recipe updates, or join our Facebook discussions where cooking fans exchange their favorite hearty meal ideas.
Print
Churro Cheesecake Recipe
- Prep Time: 21 minutes
- Cook Time: 28 minutes
- Total Time: 3 hours 49 minutes
- Yield: 16 bars 1x
- Category: Dessert
- Method: Baking
- Cuisine: Fusion (Mexican-American)
- Diet: Vegetarian
Description
This Churro Cheesecake is a delightful fusion of two beloved desserts: the crispy, cinnamon-sugar-coated churro and the creamy, luscious cheesecake. Perfect for gatherings or a sweet indulgence, this recipe is simple yet impressive, with layers of buttery crescent dough sandwiching a rich cheesecake filling. A sprinkle of cinnamon sugar on top seals the deal!
Ingredients
- Cinnamon Sugar:
- 1 tablespoon ground cinnamon
- ½ cup granulated sugar
- Cheesecake Bars:
- Two 8-ounce packages refrigerated crescent roll dough or sheets
- 16 ounces full-fat cream cheese, softened
- ¾ cup granulated sugar
- 1 large egg
- 1½ teaspoons vanilla extract
- 3 tablespoons unsalted butter, melted and slightly cooled
Instructions
1. In a small bowl, mix the cinnamon and sugar until well combined. Set aside.
2. Preheat your oven to 350°F (175°C) and position the rack in the middle. Grease a 9×13-inch baking pan and sprinkle 1–2 tablespoons of the cinnamon sugar mixture evenly on the bottom.
3. Open one tube of crescent roll dough. Unroll it carefully and press the seams together to form a single rectangular sheet. Place this sheet into the prepared pan, ensuring it covers the bottom completely.
4. In a mixing bowl, beat softened cream cheese, sugar, egg, and vanilla extract until smooth and creamy. Pour this mixture over the base layer in the pan, spreading it evenly.
5. Open the second tube of crescent roll dough, repeat the process of sealing seams, and gently place it over the cheesecake filling to form a top layer. Pour melted butter over this layer and spread it evenly using a spoon or pastry brush.
6. Sprinkle the remaining cinnamon sugar generously over the buttered top layer.
7. Bake in the preheated oven for 26–30 minutes or until the crescent dough is puffed and golden brown. Remove from oven and cool on a wire rack.
8. Once cooled to room temperature, refrigerate for at least 3 hours to allow the layers to set. Slice into bars before serving.
Notes
Serving Suggestions: Serve slightly chilled or at room temperature with fresh berries or a drizzle of caramel sauce for added flair.
Tips & Tricks:
Ensure cream cheese is fully softened for a creamy filling without lumps.
Press seams of crescent rolls tightly to prevent gaps during baking.
Storage & Reheating: Store leftovers in an airtight container in the refrigerator for up to 4 days. To reheat, warm individual bars in the microwave for about 10 seconds if you prefer them slightly warm. These bars can also be frozen for up to 3 months; thaw overnight in the fridge before serving.
Nutrition
- Serving Size: 1 bar