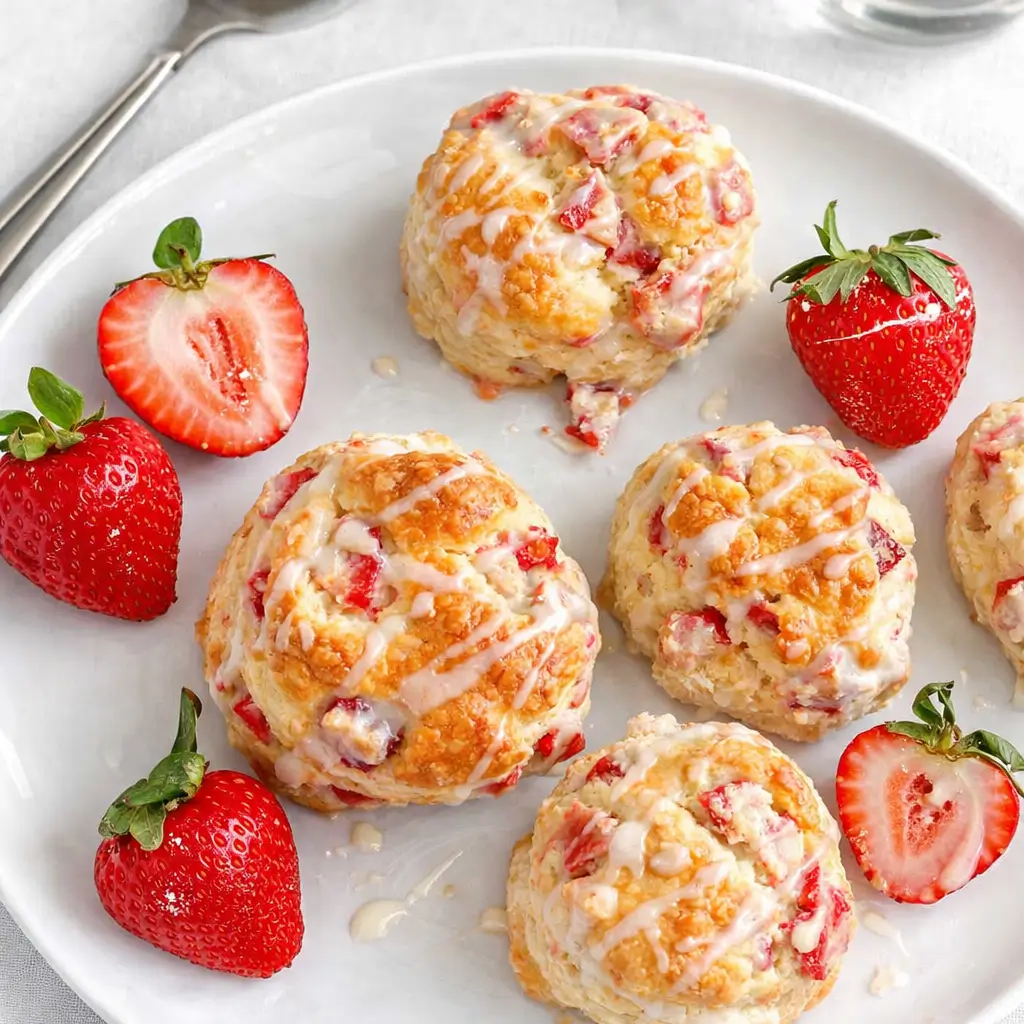
Strawberry Biscuits with Vanilla Glaze might just be the sweetest way to welcome spring (or any lazy weekend morning, really). Picture this: buttery, tender biscuits studded with juicy strawberries and topped with a dreamy drizzle of vanilla glaze that hardens just enough to create a soft crackle when you bite in. It’s like the lovechild of a classic Southern biscuit and a strawberry shortcake, and honestly, who could resist that? Whether you’re making brunch for friends, cheering up a gray morning, or just craving something that tastes like sunshine, these biscuits deliver every time.
Plus, they’re easier to make than they look—no fancy equipment, no intimidating steps, and no bakery-level stress. So grab those strawberries and your favorite mixing bowl, because this is about to become your new go-to treat whenever strawberry season rolls around.
Table of Contents
What is Strawberry Biscuits with Vanilla Glaze?
At their core, Strawberry Biscuits with Vanilla Glaze are tender, buttery biscuits made with chunks of fresh strawberries baked right in. Think of the best biscuit you’ve ever had—flaky, golden, slightly crisp on the outside—and now imagine it infused with bits of juicy strawberry that burst as they bake. Once cooled, each biscuit gets a drizzle of vanilla glaze, which adds just the right amount of sweetness without making them cloying. They’re perfect for breakfast, brunch, dessert, or even as a snack with tea. The recipe borrows its structure from traditional Southern biscuits but adds a bright, fruity twist that feels like springtime in every bite.
And if you love strawberry-based treats, you’ll definitely want to try my Strawberry Shortcake Cake or the classic Strawberry Sheet Cake with Cream Cheese Frosting next—each one celebrates strawberries in its own delicious way.
Reasons to Try Strawberry Biscuits with Vanilla Glaze
Why make these Strawberry Biscuits with Vanilla Glaze instead of, say, muffins or scones? Three reasons stand out:
1. They’re ridiculously easy. No yeast, no kneading, no drama. If you can stir and press dough, you’re golden.
2. They taste like something from a bakery. Between the buttery base and the light vanilla drizzle, they hit that perfect balance between homemade comfort and pastry-shop indulgence.
3. They’re versatile. Serve them at brunch with fresh fruit, enjoy them with coffee on a quiet morning, or sneak one as dessert after dinner.
And if you’re already in a spring baking mood, pair these with my Lemon Blueberry Cake or even the Vanilla Lavender Cupcakes with Honey Buttercream—they share that light, floral-sweet flavor profile that just feels happy.
Ingredients Needed to Make Strawberry Biscuits with Vanilla Glaze
For the Biscuits:
- 2 cups (240 g) all-purpose flour
- 1 tablespoon (12 g) baking powder
- ¼ teaspoon baking soda
- 1 tablespoon (12 g) granulated sugar
- 1 teaspoon (6 g) kosher salt
- 8 tablespoons (112 g) very cold unsalted butter, cut into cubes
- 1 cup (150 g) diced fresh strawberries
- ¾ cup (180 g) cold buttermilk
- 1 large egg whisked with 1 tablespoon water (for egg wash)
For the Vanilla Glaze:
- ½ cup (60 g) powdered sugar
- 1 tablespoon (15 g) milk
- ½ teaspoon vanilla extract
You’ll also need a food processor, a biscuit cutter, parchment paper, and a sheet pan—plus a bit of patience while those biscuits bake and fill your kitchen with the smell of buttery strawberry heaven.
Instructions to Make Strawberry Biscuits with Vanilla Glaze – Step by Step
Step 1: Prep the Strawberries and Dry Ingredients
Start by dicing your strawberries into small, even pieces. Lay them out on a paper towel to remove excess moisture—this helps your biscuits stay light and not soggy. Meanwhile, in your food processor, combine flour, baking powder, baking soda, sugar, and salt. Give it a few quick pulses to mix everything evenly.
Step-by-Step Tip: When it comes to biscuit success, cold ingredients are everything. Cold butter equals flaky layers, so resist the urge to let it soften. I like to cube mine straight from the fridge right before adding it to the mix.
Step 2: Cut in the Butter
Add your cold butter cubes to the dry mix and pulse about 5–6 times until the butter pieces are roughly pea-sized. You want visible chunks—it’s those bits of butter that melt in the oven, creating steam pockets that make your biscuits tender and layered. Pour the mixture into a large bowl, toss in the strawberries, and gently stir until the fruit is coated in flour.
For a quick pro trick, if you don’t have a food processor, you can use a pastry cutter or even two forks. The goal is the same—get those butter pieces coated and broken up without overmixing.
Step 3: Add the Buttermilk and Bring It All Together
Make a little well in the center of your mixture and pour in your cold buttermilk. Using a Danish dough whisk or a wooden spoon, gently mix until you’ve got a shaggy, loose dough. Don’t worry if it looks messy—biscuit dough isn’t supposed to be perfectly smooth.
This part is where many biscuit beginners overdo it. Don’t mix like you’re making cookie dough—just lightly stir until most of the flour is moistened. It should feel soft, sticky, and slightly crumbly.
Step 4: Shape and Stack the Dough
Turn the dough out onto a lightly floured surface. Gently pat it into a rough square. Use a bench scraper to cut the dough into four smaller squares, then stack them on top of each other. Press it down again into a square and repeat this process twice more.
This stacking step creates layers—the kind that make biscuits rise beautifully in the oven. It’s the biscuit version of lamination, but way easier than puff pastry.
Once done, pat the dough into a rectangle about ½ inch thick. Using a 2 or 3-inch biscuit cutter, cut out as many biscuits as you can. Gather the scraps gently, press them together, and cut again. You should end up with 8–12 biscuits depending on size.
Step 5: Chill and Bake
Place your cut biscuits on a parchment-lined baking sheet. Pop the tray into the freezer or fridge for 10–15 minutes while you preheat your oven to 425°F. Chilling the dough one last time helps the butter firm up again, so your biscuits bake tall and flaky instead of spreading.
Before baking, brush the tops with your egg wash—this gives them a lovely golden finish. Slide the pan into the oven and bake for 18–20 minutes, or until they’re puffed and golden brown on top.
While they bake, you’ll probably catch yourself peeking through the oven window (because who can resist watching biscuits rise?). That buttery aroma filling your kitchen? Totally worth the wait.
Step 6: Mix the Vanilla Glaze
In a small bowl, whisk together powdered sugar, milk, and vanilla extract until smooth. The glaze should be pourable but not runny—add a splash more milk if it’s too thick or a bit more sugar if it’s too thin.
Once your biscuits have cooled for about 10 minutes, drizzle the glaze generously over the tops. You can spoon it on or use a small whisk for that pretty zig-zag drizzle effect.
Step-by-Step Reminder: Don’t glaze too soon. The biscuits need time to set a little, or the glaze will melt right off. You want that perfect sweet drizzle to cling beautifully to the biscuit’s warm surface.
Step 7: Serve and Enjoy
Now comes the best part—dig in! Serve your Strawberry Biscuits with Vanilla Glaze warm for the ultimate experience. The inside will be tender and buttery, the strawberries slightly jammy, and the glaze sweet and fragrant. Pair them with hot coffee, a glass of cold milk, or even a mimosa if you’re feeling brunchy.
If you’re serving a crowd, try pairing these with something savory like Garlic Butter Chicken Tenders or Chicken Lazone for a sweet-and-savory brunch spread that will make your guests swoon.
What to Serve with Strawberry Biscuits with Vanilla Glaze
These biscuits shine on their own, but they play beautifully with a range of dishes. For brunch, pair them with Street Corn Chicken Salad or Cookout Spaghetti Salad. For something refreshing, try Strawberry Spinach Salad or a scoop of vanilla ice cream on the side for dessert. They also make an amazing base for a Southern-style strawberry shortcake—just slice them in half and sandwich whipped cream and more berries in between.
Key Tips for Making Strawberry Biscuits with Vanilla Glaze
- Keep it cold. Cold butter, cold buttermilk, and even cold hands make for flakier biscuits.
- Don’t twist the cutter. Press straight down to avoid sealing the biscuit edges.
- Use fresh strawberries. Frozen ones will release too much liquid.
- Chill before baking. This helps the biscuits hold their shape and rise taller.
- Glaze last minute. For best results, drizzle just before serving.
Storage and Reheating Tips for Strawberry Biscuits with Vanilla Glaze
These biscuits taste best the day they’re baked, but you can store leftovers covered at room temperature for up to two days. If you plan to enjoy them later, skip the glaze and store the biscuits in an airtight container. When ready to serve, warm them in the oven at 300°F for 5–7 minutes, then glaze just before eating.
Reheating glazed biscuits can be tricky—the glaze may melt—so it’s best to keep it separate if you know you’ll be saving some for later.
FAQs
Can I use frozen strawberries?
You can, but thaw them completely and pat them dry first to prevent excess moisture.
Can I make the dough ahead of time?
Yes! Prepare and cut the biscuits, then freeze them unbaked. When ready, bake straight from frozen—just add a couple extra minutes.
Can I make these dairy-free?
Swap butter with cold coconut oil or vegan butter, and use almond milk with a touch of lemon juice instead of buttermilk.
Can I skip the glaze?
Sure, but it adds that extra hint of sweetness that makes them shine. You could also top them with a dusting of powdered sugar instead.
Why didn’t my biscuits rise?
The butter may have gotten too warm, or you may have twisted the cutter. Keep everything cold, and your biscuits will puff up beautifully.
Final Thoughts
Strawberry Biscuits with Vanilla Glaze are a sweet little reminder that homemade baking doesn’t have to be complicated to be special. They’re buttery, fruity, slightly messy, and completely irresistible. Whether you’re baking them for a weekend breakfast or just to make an ordinary Tuesday a little brighter, these biscuits are proof that the simple things really are the sweetest.
And if you loved this recipe, don’t miss out on my Blueberry Lemon Loaf or Lemon Blueberry Rolls next—they’re equally comforting and guaranteed to put a smile on your face.
Now go preheat that oven and make a batch. You deserve a little strawberry magic today.
Visit our Pinterest for regular slow cooker recipe updates, or join our Facebook discussions where cooking fans exchange their favorite hearty meal ideas.
Print
Strawberry Biscuits with Vanilla Glaze: Sweet, Buttery Perfection
- Prep Time: 15 minutes
- Cook Time: 20 minutes
- Total Time: 35 minutes
- Yield: 8 biscuits 1x
- Category: Breakfast
- Method: Baking
- Cuisine: American
- Diet: Vegetarian
Description
These Strawberry Biscuits are studded with fresh, ripe strawberries and drizzled with a sweet vanilla glaze. Hello Spring!
Ingredients
- Biscuits
- 2 cups (240 g) all-purpose flour
- 1 tablespoon (12 g) baking powder
- ¼ teaspoon baking soda
- 1 tablespoon (12 g) granulated sugar
- 1 teaspoon (6 g) kosher salt
- 8 tablespoons (112 g) unsalted butter, very cold and cut into small cubes
- 1 cup (150 g) strawberries, diced
- ¾ cup (180 g) buttermilk, very cold
- 1 large egg, whisked with 1 tablespoon water for egg wash
- Vanilla glaze
- ½ cup (60 g) powdered sugar
- 1 tablespoon (15 g) milk
- ½ teaspoon vanilla extract
Instructions
1. Dice your fresh strawberries and lay them in a single layer on a piece of paper towel to remove excess moisture.
2. Measure all of your dry ingredients into the bowl of your food processor. Pulse a few times to mix.
3. Add cold butter cubes to the dry ingredients and pulse 5–6 times, or until most of the butter is in pea-sized or smaller pieces.
4. Pour into a mixing bowl, add the diced strawberries, and toss in.
5. Make a well in the center and add the cold buttermilk. Gently bring the wet and dry together until you have a fairly uniform, loose dough.
6. Dump the dough onto a lightly floured surface. Gently bring it together into a rough square.
7. Cut into four smaller squares. Stack the pieces of dough on top of each other. Press down and reshape into a square. Repeat this cutting and stacking process two more times.
8. Pat the dough into a rectangle at least ½ inch thick. Use a 2 or 3 inch biscuit or cookie cutter to cut out biscuits.
9. Gather scraps, re-form gently, and cut additional biscuits. You should get 8 to 12 biscuits.
10. Place biscuits on a parchment-lined small sheet pan and chill in the freezer or refrigerator while preheating the oven to 450°F.
11. Remove biscuits from the freezer, brush tops with egg wash, and bake in a 425°F oven for 18–20 minutes until golden brown.
12. In a small bowl, whisk together the powdered sugar, milk, and vanilla.
13. Allow biscuits to cool for 10 minutes, then drizzle generously with the glaze.
Notes
Do not twist the biscuit cutter when cutting your biscuits. Press straight down and lift straight up to allow for full rising.
Best eaten the same day. Store covered at room temperature for up to 2 days.
For best results, wait to glaze until ready to serve. Reheat in oven or microwave as needed.
Nutrition
- Serving Size: 1 biscuit
- Calories: 280
- Sugar: 10g
- Sodium: 350mg
- Fat: 14g
- Saturated Fat: 9g
- Unsaturated Fat: 4g
- Trans Fat: 0g
- Carbohydrates: 34g
- Fiber: 1g
- Protein: 4g
- Cholesterol: 55mg