Red Velvet Cheesecake Brownies are the dessert dreams are made of—rich, fudgy, slightly tangy, and beautifully marbled with creamy cheesecake swirls. This isn’t your average brownie situation—it’s love at first bite. Whether you’re baking for Valentine’s Day, a family gathering, or a random Tuesday (because yes, you deserve that), this recipe brings the perfect balance of chocolate and cheesecake in one irresistible pan. The best part? You don’t need fancy ingredients or hours in the kitchen—just a few pantry staples and a whisk. And trust me, once you taste them, you’ll never go back to plain brownies again.
Table of Contents
What is Red Velvet Cheesecake Brownies?
Red Velvet Cheesecake Brownies are a mashup of two classic desserts—rich red velvet brownies and creamy cheesecake. The red velvet layer has that signature hint of cocoa and vibrant red hue, while the cheesecake swirl adds a luscious, slightly tangy contrast. The result is a dessert that’s as beautiful as it is indulgent. Think of it as the dessert version of a power couple—cheesecake brings the creamy, red velvet brings the drama, and together, they’re magic. These brownies are also surprisingly easy to make, which means you can whip them up for parties, holidays, or just because your sweet tooth whispered, “Hey, why not?”
Reasons to Try Red Velvet Cheesecake Brownies
If you’re on the fence about making these Red Velvet Cheesecake Brownies, let me nudge you over—gently but persuasively. First, they’re absolutely stunning. That deep red color swirled with creamy white cheesecake looks like something straight out of a bakery window. Second, the flavor combination is next-level—sweet, slightly tangy, and irresistibly rich. Third, they’re versatile. Serve them chilled for a fudgier bite or slightly warm for that melt-in-your-mouth texture. And if you’ve ever had picky eaters at home (who hasn’t?), these brownies tend to win everyone over—kids, adults, even the “I don’t like sweets” crowd.
Ingredients Needed to Make Red Velvet Cheesecake Brownies
For the Brownie Layer:
- 8 tablespoons butter, melted and cooled
- 1 cup granulated sugar
- 2 large eggs
- 3 teaspoons red gel food coloring
- 1 teaspoon white vinegar
- 1 teaspoon vanilla extract
- ¾ cup all-purpose flour
- ¼ cup unsweetened cocoa powder
- ¼ teaspoon salt
For the Cheesecake Swirl:
- 8 ounces cream cheese, softened
- ¼ cup granulated sugar
- 1 large egg
- ½ teaspoon vanilla extract
Instructions to Make Red Velvet Cheesecake Brownies (Step by Step Guide)
If you’ve ever been intimidated by those fancy bakery-style desserts, take a deep breath—because these Red Velvet Cheesecake Brownies are surprisingly simple to make. This step-by-step guide walks you through every detail so you can bake with confidence (and maybe even a little swagger). Let’s dive right in and make your kitchen smell like heaven!
Step 1: Preheat, Prep, and Set the Stage
First things first: preheat your oven to 350°F (175°C). While it warms up, grab your 8×8-inch baking pan and line it with parchment paper, letting the edges hang over the sides—this makes lifting out the brownies a total breeze later on. You can also lightly grease the parchment for easy cleanup.
If you’re new to parchment paper baking, check out our Strawberry Cake Mix Cookies post for extra tips on prepping pans the right way. Proper preparation at this stage ensures even baking and picture-perfect brownie edges.
Step 2: Mix the Red Velvet Brownie Batter
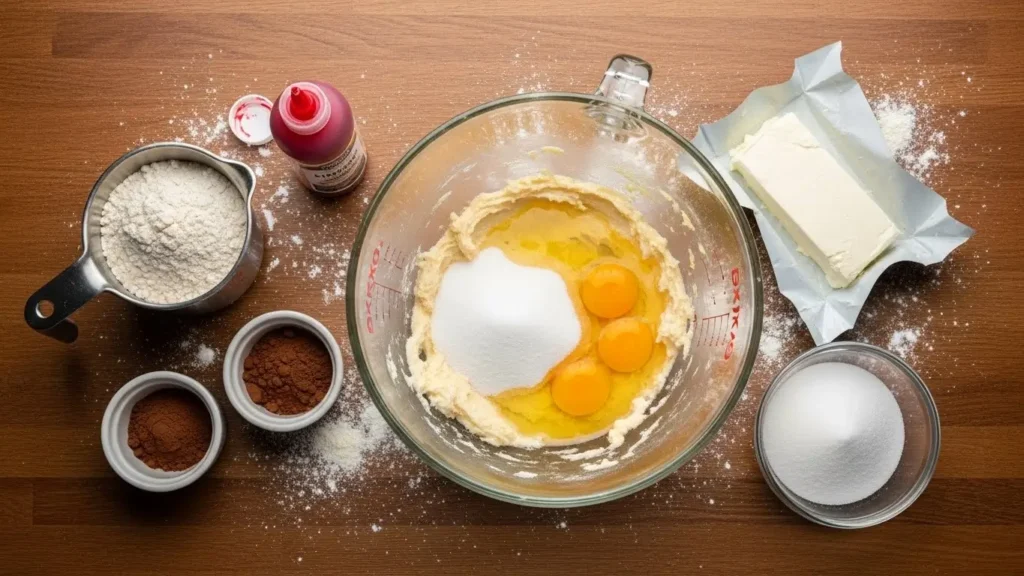
Now it’s time to create that signature red velvet magic. In a medium mixing bowl, combine the melted butter and sugar. Stir or whisk them together until they look silky and glossy—that’s how you know the sugar has started to dissolve.
Crack in two eggs, then add the vanilla extract, white vinegar, and that all-important red gel food coloring. Mix until everything is smooth and vibrantly red. If you want a deeper hue, you can always add an extra drop or two of food coloring.
In a separate bowl, whisk together the flour, unsweetened cocoa powder, and salt. Gently fold these dry ingredients into the wet mixture. Stop mixing as soon as everything is combined—you’re going for that fudgy texture, not cake-like. Overmixing is the enemy of chewy brownies!
(Pro Tip: Want to learn more about mixing techniques for fudgy desserts? You might enjoy reading our Red Velvet Truffles recipe, where the same balance of rich and tender texture comes into play.)
Step 3: Whip Up the Cheesecake Swirl
In another bowl, beat the cream cheese until it’s smooth and free of lumps. This step is crucial—softened cream cheese blends better and creates that dreamy, creamy swirl. Add in the sugar, egg, and vanilla extract, then mix again until it’s silky and uniform.
If you’ve ever made our No-Bake Strawberry Cheesecake Bars, you’ll notice a similar technique here: the smoother your cream cheese layer, the more luxurious the final bite.
Step 4: Layer and Swirl – The Fun Part!
Here’s where the magic happens. Pour two-thirds of your red velvet batter into the prepared baking dish and use a spatula to spread it evenly. Next, spoon the cheesecake mixture gently over the top, spreading it to cover the brownie layer completely.
Now, take the remaining red velvet batter and drop spoonfuls of it across the cheesecake layer. Use a butter knife or skewer to swirl the batters together in gentle figure-eight motions. Don’t go overboard—you want to create marbled ribbons, not fully blend the two layers.
(If swirling intimidates you, our Strawberry Cream Cheese Heart Puffs recipe shows another fun way to mix textures beautifully without stress.)
Step 5: Bake to Perfection
Slide the pan into your preheated oven and bake for 30–35 minutes, or until the center looks just set. A little jiggle is okay, but the middle shouldn’t be wobbly. If you’re unsure, insert a toothpick—if it comes out mostly clean (a few moist crumbs are fine), you’re golden.
The cheesecake layer should look slightly puffed and have a faint golden tint around the edges. Your kitchen will smell like a red velvet dream at this point—don’t be surprised if everyone suddenly “wanders” into the kitchen asking when it’ll be ready.
Step 6: Cool, Slice, and Serve
Once baked, let the brownies cool completely in the pan. It’s tempting to dig in right away (we’ve all been there), but cooling allows the layers to set for that perfect texture. For extra neat slices, chill the brownies in the fridge for 30–60 minutes before cutting.
Use the parchment overhang to lift the brownies out of the pan, then slice into squares with a clean, sharp knife. Wipe the knife between cuts for bakery-perfect edges. Serve them as they are, or for an indulgent twist, top with a scoop of vanilla ice cream.
(Bonus idea: Pair these brownies with your favorite drink! Try our Crockpot Angel Chicken for dinner, then end the night with this dessert—it’s the ultimate cozy combo.)
This step-by-step guide turns your kitchen into a mini bakery without any of the stress. From prepping your pan to mastering that marbled swirl, each step helps you create rich, creamy, and unforgettable Red Velvet Cheesecake Brownies. So grab that whisk, preheat that oven, and get ready to bake up some joy—one fudgy step at a time.
What to Serve with Red Velvet Cheesecake Brownies
These brownies are show-stoppers on their own, but if you want to get a little extra, serve them with a dollop of whipped cream or a scoop of vanilla ice cream. Feeling festive? A drizzle of chocolate syrup or raspberry sauce makes them look and taste like something from a fancy café. You can also pair them with coffee or hot cocoa for a cozy evening treat. And if you’re planning a dessert table, they pair beautifully with other red velvet treats like our Red Velvet Truffles or the fruity sweetness of Strawberry Cake Mix Cookies.
Key Tips for Making Red Velvet Cheesecake Brownies
- Use gel food coloring—it gives a richer red color without thinning your batter.
- Don’t overmix the batter. Overmixing makes brownies cakey instead of fudgy.
- Room temperature ingredients make smoother batters and creamier cheesecake swirls.
- Swirl gently—less is more when marbling; too much and the layers will blend.
- Cool completely before cutting for neat, bakery-worthy squares.
Storage and Reheating Tips for Red Velvet Cheesecake Brownies
Store these brownies in an airtight container in the fridge for up to 5 days. Because of the cream cheese layer, refrigeration keeps them fresh and safe to eat. If you want to freeze them, wrap each piece tightly in plastic wrap, then place them in a freezer bag for up to 3 months. When ready to eat, thaw in the fridge overnight and enjoy cold or at room temperature. For a warm treat, microwave a brownie for about 10–15 seconds—just enough to bring back that melt-in-your-mouth texture.
FAQs
1. Can I use liquid food coloring instead of gel?
You can, but you’ll need more of it, and it may slightly affect the batter’s consistency. Gel gives the best color payoff.
2. Can I double the recipe?
Absolutely! Just use a 9×13-inch pan and add a few extra minutes of baking time.
3. What if I don’t have vinegar?
You can skip it, but vinegar enhances the classic red velvet flavor and helps the color pop.
Final Thoughts
Red Velvet Cheesecake Brownies are one of those desserts that look fancy but are secretly super simple to make. They’re rich, creamy, and just the right amount of decadent—perfect for when you want to impress without the stress. Whether you’re sharing them with friends or enjoying them in your quiet kitchen moment, they bring pure joy in every bite. If you love this recipe, you’ll also adore our No-Bake Strawberry Cheesecake Bars and Strawberry Cream Cheese Heart Puffs.
Visit our Pinterest for regular slow cooker recipe updates, or join our Facebook discussions where cooking fans exchange their favorite hearty meal ideas.
Print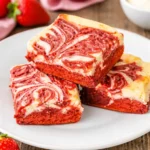
Red Velvet Cheesecake Brownies – The Ultimate Creamy Fudge Dessert
- Prep Time: 20 minutes
- Cook Time: 30 minutes
- Total Time: 50 minutes
- Yield: 9 servings 1x
- Category: Dessert
- Method: Baking
- Cuisine: American
- Diet: Vegetarian
Description
These Red Velvet Cheesecake Brownies combine rich, fudgy red velvet brownie layers with creamy cheesecake swirls for an irresistibly decadent dessert.
Ingredients
- 8 tablespoons Butter, melted and cooled
- 1 cup Granulated Sugar
- 2 large Eggs
- 3 teaspoons Red Gel Food Coloring
- 1 teaspoon White Vinegar
- 1 teaspoon Vanilla Extract
- 3/4 cups All Purpose Flour
- 1/4 cup Unsweetened Cocoa Powder
- 1/4 teaspoon Salt
- Cheesecake Swirl:
- 8 ounces Cream Cheese
- 1/4 cup Granulated Sugar
- 1 large Egg
- 1/2 teaspoon Vanilla Extract
Instructions
1. Preheat your oven to 350°F.
2. Line an 8×8 inch baking dish with parchment and set aside.
3. In a medium mixing bowl, mix the melted butter and sugar together.
4. Add the eggs, white vinegar, vanilla, and food coloring, and mix well to combine.
5. In a medium bowl, whisk together the flour, cocoa powder, and salt.
6. Add the dry ingredients to the wet ingredients, mixing until just combined.
7. In a separate mixing bowl, beat the cream cheese until smooth.
8. Add in the sugar, egg, and vanilla for the cheesecake layer and mix to combine.
9. Add 2/3 of the red velvet batter to your baking dish and smooth out evenly.
10. Pour the cheesecake mixture over top and smooth out evenly.
11. Add dollops of the remaining 1/3 red velvet brownie batter over the cheesecake layer.
12. Use a butter knife to swirl the red velvet and cheesecake together.
13. Bake for 30-35 minutes, until the center cheesecake part is no longer wiggly.
14. Allow the brownies to cool completely before slicing and serving.
Notes
For the best swirls, avoid overmixing the layers.
Use gel food coloring for the brightest red hue.
You can double the recipe and bake in a 9×13 pan for a larger batch.
Store leftovers in the fridge for up to 5 days, or freeze for longer storage.
Nutrition
- Serving Size: 1 brownie
- Calories: 298
- Sugar: 35
- Sodium: 249
- Fat: 10
- Saturated Fat: 6
- Unsaturated Fat: 3.5
- Trans Fat: 0.03
- Carbohydrates: 49
- Fiber: 1
- Protein: 4
- Cholesterol: 46