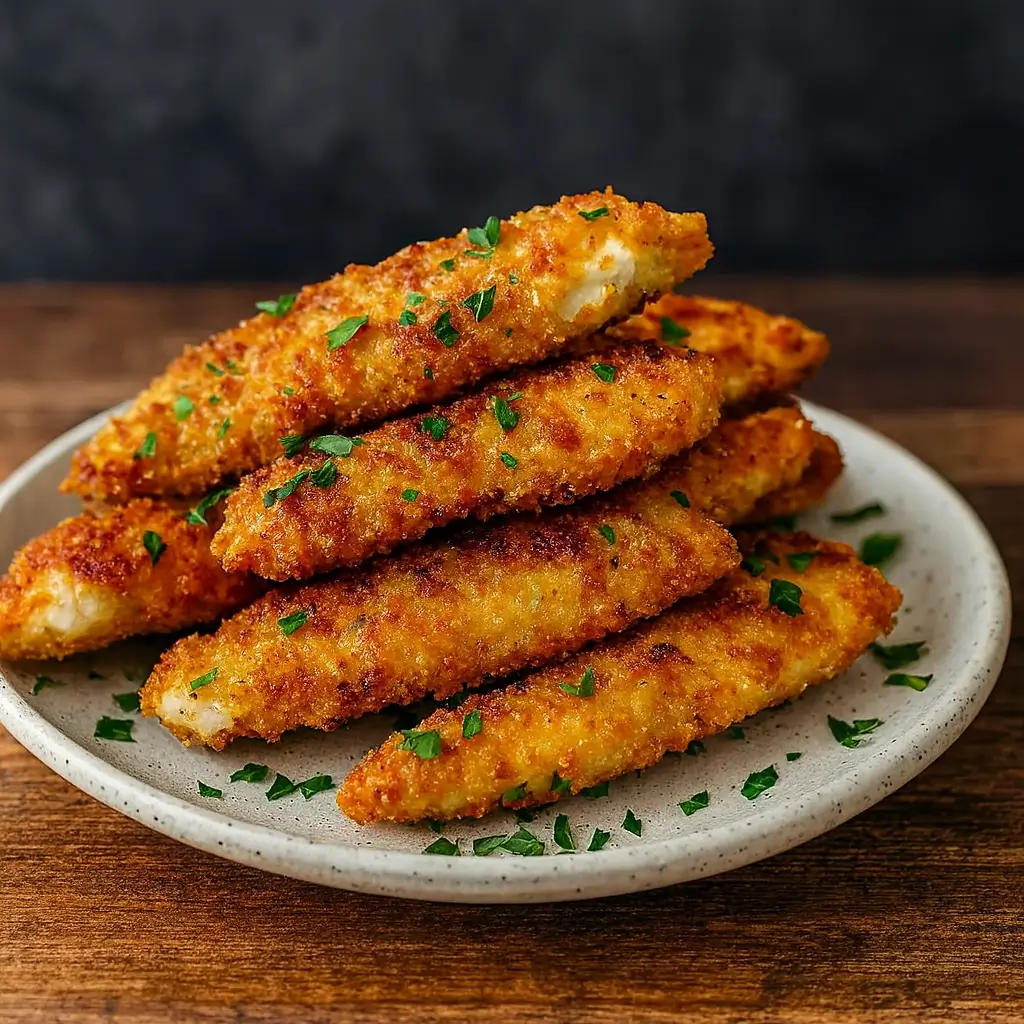
Crispy Baked Chicken Tenders are the ultimate comfort food — golden on the outside, tender on the inside, and baked instead of fried for a guilt-free crunch that still delivers that satisfying “snap” when you bite in. Whether you’re cooking for kids, prepping weekday lunches, or just craving something nostalgic, these homemade chicken tenders hit all the right notes. They’re quick, flavorful, and made with pantry staples, which means you can whip them up anytime without the drive-thru line. Plus, there’s something so rewarding about making your own crispy chicken at home. It’s cheaper, cleaner, and, honestly, better than any fast-food version.
Table of Contents
What is Crispy Baked Chicken Tenders?
Crispy Baked Chicken Tenders are seasoned chicken strips coated in a flavorful breadcrumb mixture and baked until golden and crunchy. Instead of deep-frying, this version uses an oven to achieve that crave-worthy texture with less oil and fewer calories. The secret lies in using panko breadcrumbs, a light spritz of olive oil, and a wire rack that allows air to circulate around each tender, ensuring every piece crisps evenly. The result? Juicy chicken inside with a perfectly crisp exterior. They’re versatile too—you can serve them as a main dish, snack, or even meal prep protein for salads and wraps. It’s the healthier twist on classic comfort food that doesn’t sacrifice flavor or crunch.
Reasons to Try Crispy Baked Chicken Tenders
If you’ve been searching for an easy, wholesome dinner that the whole family will devour, this recipe is your new best friend. Crispy Baked Chicken Tenders are quick, oven-friendly, and ideal for busy weeknights when you need something delicious in under 30 minutes. They’re also freezer-friendly, making them perfect for meal prepping or planning ahead. Kids love them, adults crave them, and your kitchen will smell incredible while they bake. You can even pair them with homemade dipping sauces or classic sides like roasted vegetables or mashed potatoes. And if you’re looking for another quick, flavor-packed chicken idea, try my Fiery Chicken Ramen with Creamy Garlic Sauce for a fun twist on spicy comfort food.
Ingredients Needed to Make Crispy Baked Chicken Tenders
You’ll need 1 pound of chicken breasts or chicken tenders (cut into strips if using breasts), 2 large beaten eggs, 1 cup of panko breadcrumbs or regular breadcrumbs, ½ cup of grated Parmesan cheese (optional for extra flavor), 1 teaspoon garlic powder, 1 teaspoon paprika, ½ teaspoon onion powder, ½ teaspoon salt, ¼ teaspoon black pepper, and olive oil spray for coating.

Instructions to Make Crispy Baked Chicken Tenders (Step by Step)
This step-by-step guide will walk you through exactly how to make irresistibly crunchy, juicy, and golden Crispy Baked Chicken Tenders right in your oven—no fryer needed! Every stage is designed to be simple, efficient, and full of helpful tricks to ensure perfect results every single time. Whether you’re new to cooking or a seasoned home chef, you’ll find this process easy to follow and totally worth the effort.
Step 1: Prepare and Trim the Chicken
Start this step-by-step recipe by preparing your chicken. If you’re using chicken breasts, place them on a cutting board and slice them into even strips—about one inch wide. If you’ve got pre-cut chicken tenders, you’re already ahead! Trimming your chicken to a uniform size ensures they bake evenly and stay tender inside. For maximum juiciness, pat each piece dry with paper towels—this helps the coating stick better and crisp beautifully in the oven. If you enjoy working with chicken-based recipes, you’ll love my Pear and Gorgonzola Stuffed Chicken, which also uses this quick prep method for perfectly cooked chicken every time.
Step 2: Set Up the Breading Stations
Next, let’s get our coating ready in this step-by-step setup. Grab two shallow bowls: in the first, beat two large eggs until smooth—this will act as your binding layer. In the second, mix together the panko breadcrumbs, Parmesan cheese (for extra flavor and crunch), garlic powder, paprika, onion powder, salt, and black pepper. The panko gives that light, airy crunch, while the Parmesan adds a touch of savory depth. You can also experiment here—swap in Italian-style breadcrumbs or add a sprinkle of cayenne if you like a little heat. For more ideas on flavorful coatings, check out the bold seasonings used in my Fiery Chicken Ramen with Creamy Garlic Sauce, where spice and texture play together beautifully.
Step 3: Season the Chicken for Maximum Flavor
Before breading, lightly season your chicken strips with a pinch of salt and pepper. This step-by-step move might seem small, but it makes a world of difference. Seasoning the chicken itself ensures flavor goes all the way through, not just in the coating. Think of this step as the secret to restaurant-quality taste at home. If you enjoy layering flavors, take inspiration from dishes like my French Mustard Chicken, which also starts with well-seasoned protein for depth and richness.
Step 4: Coat the Chicken in Layers for Extra Crunch
Now for the fun part—breading! Follow this step-by-step process to get that irresistible golden crunch. Dip each chicken strip into the beaten eggs, letting the excess drip off, then roll it in the breadcrumb mixture, pressing gently so the crumbs stick. Want a thicker, crispier crust? Double-dip! Go back into the egg, then again into the breadcrumbs. This creates a coating that bakes up shatteringly crisp. Pro tip: use one hand for wet (egg) and one for dry (crumbs) to keep your hands from turning into breaded mittens.
Step 5: Prepare Your Baking Sheet
Line a large baking sheet with parchment paper or a silicone baking mat to make cleanup a breeze. If you have a wire rack, place it on top of the baking sheet—this is a step-by-step game-changer! The rack lifts the tenders slightly off the surface, allowing air to circulate underneath. The result? A perfectly even crisp from every angle, without having to flip constantly. Give the rack a quick spritz of olive oil spray so your tenders don’t stick. This method is similar to what I use in my Ground Turkey Sweet Potato Bake, where airflow ensures even cooking without drying out your ingredients.
Step 6: Arrange the Chicken Tenders
Place each breaded chicken tender on the prepared rack or parchment, leaving space between each one. This step-by-step spacing trick is key—crowding your chicken will trap steam, leading to soggy coating instead of that irresistible crunch. Lightly mist the tops of the tenders with olive oil spray. That little bit of oil helps the breadcrumbs crisp up beautifully in the oven, giving you that fried-chicken effect—minus the fryer.
Step 7: Bake Until Golden and Crispy
Preheat your oven to 400°F (200°C). Slide the baking sheet into the oven and bake your Crispy Baked Chicken Tenders for 20 to 25 minutes, flipping halfway through. This step-by-step flip ensures even browning on both sides. The tenders should come out golden brown with a crisp coating and juicy interior. Use a meat thermometer to check for doneness—165°F (74°C) means they’re perfect. The aroma will fill your kitchen with that mouthwatering “dinner’s ready” scent that draws everyone to the table. For another crispy, golden favorite, check out my Italian Penicillin Soup—it’s comfort food with the same soul-warming effect.
Step 8: Serve and Enjoy the Perfect Bite
Once baked, let your tenders rest for a few minutes before serving. This short step-by-step rest allows the juices to settle and keeps the inside tender while the coating stays crunchy. Serve your chicken tenders hot with dipping sauces like honey mustard, ranch, or BBQ. They’re also amazing with a side of Easy Vegetable Soup or over a salad for a lighter meal. Want to impress? Add a drizzle of spicy mayo or sprinkle with fresh herbs for a restaurant-style finish.
Step 9: Pro Tips for Next-Level Crispiness
For the ultimate crispy finish, don’t skip these final step-by-step tips. Always use panko breadcrumbs—they bake up lighter and crunchier than traditional crumbs. Avoid overcrowding your pan, and make sure your oven is fully preheated before baking. If you want to reheat leftovers, skip the microwave and pop them in the oven for 10 minutes at 375°F. They’ll come out just as crunchy as day one. And if you’re a fan of crunchy, baked comfort food, you’ll absolutely love my Cheesy Mashed Potato Puff Bites—they’re bite-sized, golden, and perfect for pairing with these tenders.
Step 10: Store for Later or Meal Prep Like a Pro
If you’re planning ahead, store any cooled tenders in an airtight container in the fridge for up to three days. To freeze, lay them in a single layer on a baking sheet until solid, then transfer to a freezer-safe bag. This step-by-step method prevents sticking and keeps the coating crisp. When ready to eat, reheat directly from frozen at 375°F for about 20 minutes. These make excellent protein additions for wraps, salads, or lunchboxes throughout the week.
By following this step-by-step guide, you’ll master the art of making Crispy Baked Chicken Tenders that are crunchy on the outside, tender inside, and full of flavor. It’s the perfect mix of comfort food and convenience—and once you try it, you’ll wonder why you ever reached for frozen tenders again.
What to Serve with Crispy Baked Chicken Tenders
These chicken tenders are versatile and go with just about anything. Serve them with fries, mac and cheese, a crisp green salad, or a comforting bowl of soup. For a light but filling option, pair them with Easy Vegetable Soup. Or if you’re feeling bold, try dipping them in homemade garlic sauce or sweet chili glaze for a flavor twist.
Key Tips for Making Crispy Baked Chicken Tenders
For the best crunch, use panko breadcrumbs instead of regular ones. Always spray lightly with olive oil before baking—it helps mimic that fried texture. Want even more crispiness? Bake them on a wire rack instead of directly on the pan. For flavor variations, try adding dried herbs, a pinch of cayenne, or a squeeze of lemon juice over the finished tenders. Following this step-by-step method guarantees crispy perfection every time.
Storage and Reheating Tips for Crispy Baked Chicken Tenders
If you’ve got leftovers (lucky you!), store them in an airtight container in the fridge for up to three days. To reheat, place them in the oven at 375°F for 10–12 minutes or until warm and crispy again. Avoid microwaving—it softens the coating. You can also freeze baked tenders in a single layer before storing them in a freezer bag for up to three months. Reheat straight from frozen for about 20 minutes.
FAQs
Can I make these gluten-free? Yes! Simply use gluten-free breadcrumbs or crushed cornflakes.
Can I air-fry them instead? Absolutely! Air fry at 400°F for 12–14 minutes, flipping halfway through.
Can I prepare them ahead of time? You can bread the chicken in advance and refrigerate for a few hours before baking.
What’s the best dipping sauce? Try honey mustard, buffalo sauce, or ranch—whatever fits your flavor mood.
Final Thoughts
There’s something truly satisfying about making Crispy Baked Chicken Tenders at home. They’re simple, crunchy, and downright delicious. This step-by-step recipe gives you all the crispy goodness of fried chicken without the mess or guilt. Whether you’re cooking for your kids, a casual dinner, or meal prepping for the week, these golden tenders a
Visit our Pinterest for regular slow cooker recipe updates, or join our Facebook discussions where cooking fans exchange their favorite hearty meal ideas.
Print
Crispy Baked Chicken Tenders – Easy, Golden, and Delicious
- Prep Time: 10 minutes
- Cook Time: 20 minutes
- Total Time: 30 minutes
- Yield: 4 servings 1x
- Category: Main Course
- Method: Baking
- Cuisine: American
Description
Homemade baked chicken tenders are a delicious, healthier alternative to the deep-fried version. This easy recipe features tender, juicy chicken strips coated in a crispy, golden breadcrumb coating. Perfect for a quick weeknight dinner, meal prepping, or a fun family meal.
Ingredients
- 1 lb chicken breasts or chicken tenders, cut into strips
- 2 large eggs, beaten
- 1 cup panko breadcrumbs or regular breadcrumbs
- ½ cup grated Parmesan cheese (optional for extra flavor)
- 1 tsp garlic powder
- 1 tsp paprika
- ½ tsp onion powder
- ½ tsp salt
- ¼ tsp black pepper
- Olive oil spray for coating
Instructions
1. Prep the Chicken: If using chicken breasts, cut them into strips (about 1-inch wide). If using chicken tenders, you can skip this step.
2. Prepare the Breading Stations: In one bowl, beat the eggs until smooth. In another bowl, combine the panko breadcrumbs, Parmesan cheese (if using), garlic powder, paprika, onion powder, salt, and black pepper.
3. Season the Chicken: Season the chicken tenders with a pinch of salt and pepper.
4. Bread the Chicken: Dip each chicken strip first into the beaten egg, allowing any excess to drip off. Then, coat the chicken strip in the breadcrumb mixture, pressing lightly to ensure the crumbs stick. For an extra crunchy coating, you can repeat the egg and breadcrumb dipping process (double coating).
5. Prepare the Baking Sheet: Line a baking sheet with parchment paper or a silicone baking mat for easy cleanup. If you have a wire rack, place it on top of the baking sheet. This will allow air circulation and help the tenders crisp up.
6. Arrange the Chicken on the Baking Sheet: Place the breaded chicken tenders on the prepared baking sheet (or wire rack), leaving space between each tender for even cooking.
7. Bake the Chicken Tenders: Preheat the oven to 400°F (200°C). Spray the chicken tenders lightly with olive oil spray for an extra crispy texture. Bake for 20-25 minutes, flipping halfway through. The tenders should be golden brown and crisp when done. Ensure the chicken reaches an internal temperature of 165°F (74°C) for full doneness.
8. Serve and Enjoy: Once the chicken tenders are cooked, remove them from the oven and let them rest for a few minutes. Serve with your favorite dipping sauces like honey mustard, BBQ sauce, or ranch!
Notes
You can double coat the chicken for extra crunch.
Using a wire rack on your baking sheet helps keep the bottom crispy too.
Parmesan adds a savory boost, but you can omit it for dairy-free.
Make extra and refrigerate for meal prep—reheat in the oven or air fryer!
Nutrition
- Serving Size: 1/4 of recipe
- Calories: 375
- Sugar: 1g
- Sodium: 480mg
- Fat: 18g
- Saturated Fat: 5g
- Unsaturated Fat: 11g
- Trans Fat: 0g
- Carbohydrates: 18g
- Fiber: 1g
- Protein: 34g
- Cholesterol: 155mg